
Managing multiple projects gets messy fast. You’re juggling properties, construction timelines, contracts, permits, and among all this, somehow you lose track of which project is actually moving forward.
To fix this mess, monday.com offers three different ways of tracking projects. You can pick one, depending on how many projects you’re managing and how complex they get.
Let me walk you through all three methods using a real example: tracking different projects (purchasing and renovating properties) of a company renting out Airbnb properties. By the end, you’ll know exactly which setup works for your business.
If you rather want to watch a video tutorial of the entire process, check this:

Method 1: Single Board Setup (Perfect for Beginners)
This is where everyone should start. One board where everything is in one place.
How It Works
Think of your board as a master list. Each property you’re managing becomes a single item on that board, let’s say “123 Main Street,” “456 Oak Avenue,” and “789 Pine Road.”
Under each property item, you can add sub-items for every task you need to complete. Things like:
- Finalize contracts
- Get permits
- Schedule inspections
- Order materials
- Hire contractors
Every task stays right under its property. Open up “123 Main Street,” and you will see every single thing you need to do for that property.
Making It Visual
After having a list of tasks, you may want to see their progress at a glance. You can use the status columns and progress tracking for this purpose.
Add a status column to your sub-items. Mark tasks as “Not Started,” “Working on It,” or “Done.” As you work through tasks, update the status.
But you don’t need to open each property item just to see what’s happening. Rolling up the status column to the parent level will do this.
How to do this:
- Click the three dots on your status column
- Select “show summary on parent item”
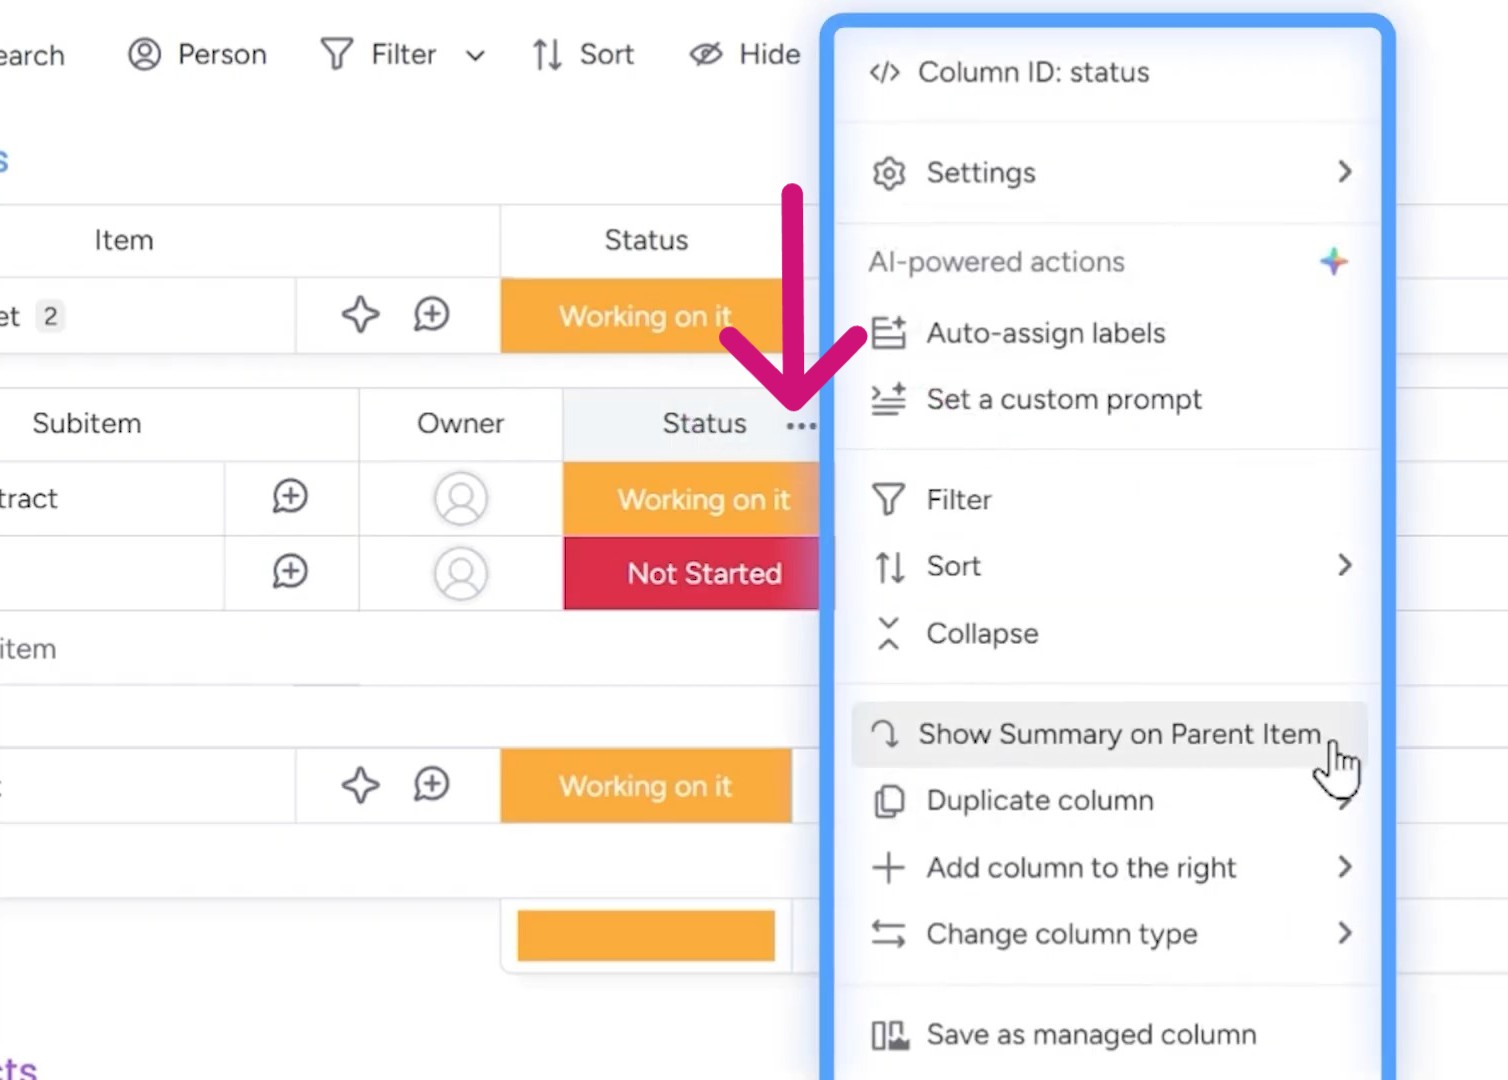
Now your main board shows a summary of the tasks for each property. Hover over it and you’ll see something like “50% Working on It” or “50% Not Started.” As you add more or complete tasks, this updates automatically.
The Progress Column Upgrade
Status columns work, but you can use the progress columns if you want something cleaner-looking.
Add a progress tracking column to your sub-items. When you mark a task as done, the progress jumps to 100%. When it’s not started, it shows 0%.
Roll this up to the parent level too (follow the same process of rolling up the status columns).
Now your main board displays progress bars for each property. You can instantly see that “123 Main Street” is 50% complete, while “456 Oak Avenue” is at 25%.
Scan your board in literally three seconds and know where every project stands.
Who This Method Works For
This method is perfect when you’re managing:
- 5-10 projects
- Projects with 10-20 tasks each
- A solo operation or small team
Method 2: High-Level and Low-Level Boards (for Growing Teams)
A single board will look cramped once you open 15-20 projects. If you need more space for detailed task management, but still want a simple overview of all projects, you can use high-level and low-level boards.
- High-level board (Projects board): Lists all your properties as items. This is your command center where you see everything at once.
- Low-level boards (Property boards): Individual boards for each property where all the detailed tasks live, such as “123 Main Street Board,” “456 Oak Avenue Board,” etc.
Then, you connect them so information flows between both.
Setting It up
Start with your Projects board. List each property as an item — just the names, basic info, maybe target completion dates.
Now create separate boards for each property. On the “123 Main Street” board, add all your tasks: finalize contracts, get permits, order materials, schedule inspections, etc.
Then, you need to connect these boards.
Steps to connect:
- On your Projects board, click the plus button to add a column
- Search for “connected boards” and select it
- Choose which property boards you want to connect (select your “123 Main Street Board,” “456 Oak Avenue Board,” etc.)
Critical step: Check the box for “create a two-way connection” before you click “connect boards.”
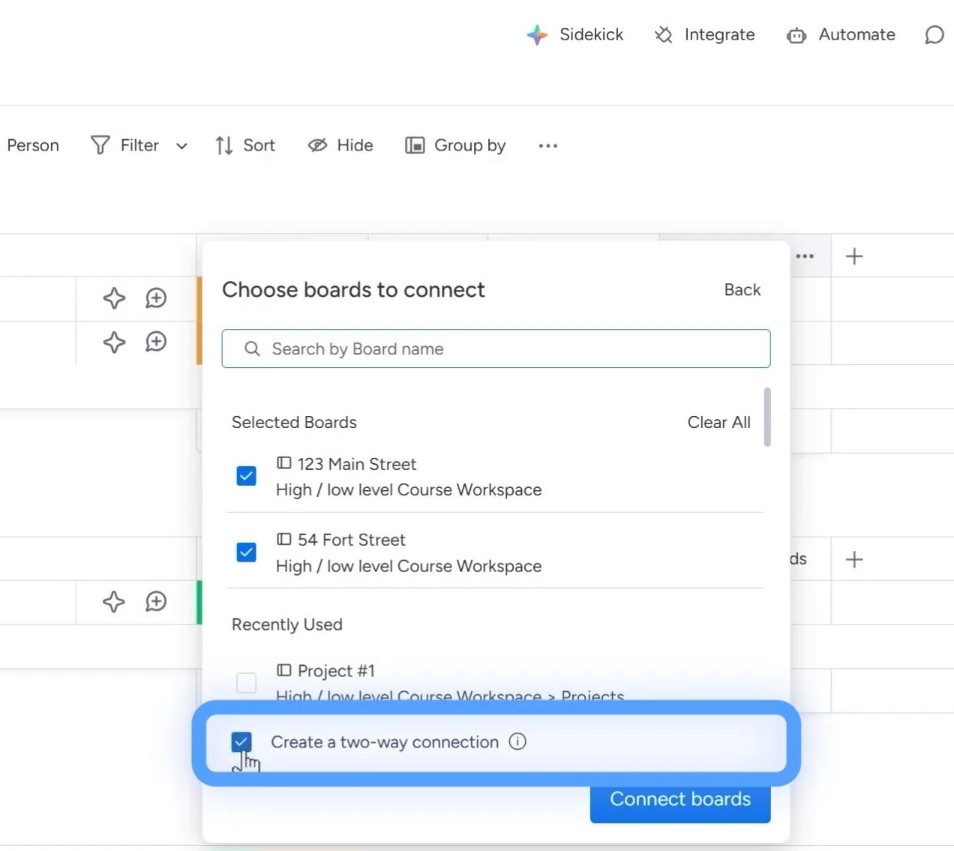
That checkbox matters. A two-way connection means:
- Your Projects board shows information from the property boards
- Your property boards show which project they belong to
Information flows both ways automatically.
Pulling in the Right Data
Connecting boards is step one. But you want to see specific information on your Projects board, like task statuses and progress.
This is where mirror columns come in.
Let’s say your property boards have a progress tracking column. You want to see that progress on your Projects board without opening each property board.
How to set the progress tracking:
- Add a mirror column to your Projects board. After you click “connect boards,” an option appears for creating a mirror column.
- Then, click the three dots on that column.
- Select “duplicate column.”
- Click “settings” on the duplicated column.
- Change it to mirror the progress tracking column from your connected boards.
Now you see real-time progress for each property directly on your Projects board. Update a task on the “123 Main Street Board” from “working on it” to “done,” and watch the progress bar on your Projects board update instantly.
The Manual Connection Process
When you add a new property to your Projects board, you need to manually connect it to its corresponding property board.
So if you add “789 Pine Road” to your Projects board, you need to:
- Go to the connected boards column
- Click to select boards
- Choose the “789 Pine Road Board”
- Add the tasks from that board
There’s a workaround called “match automations” that can automate this by matching item names between boards, but that requires setup and understanding of monday.com’s automation features.
The Limitations You Need to Know
This method works great until you hit the connection limits.
On the Pro plan: You can only connect 20 boards to your high-level board. So 20 properties maximum.
On the Enterprise plan: You can connect up to 60 boards.
Managing 100 properties? This method won’t work. That’s why method three exists.
Who This Works For
This setup is ideal when you’re managing:
- 20-60 projects (depending on your plan)
- Projects with complex, detailed task lists
- Multiple team members who need to focus on individual projects while leadership needs the big picture
You get separation between overview and details without losing visibility.
Method 3: Portfolio Feature (Enterprise Only)
If you’re on the Enterprise plan and managing dozens (or hundreds) of projects, the portfolio feature is a game-changer.
It takes everything good about method two and automates the manual parts while adding powerful reporting features.
Setting up Portfolio
You’ll find it in the Work Management product and is only available on Enterprise.
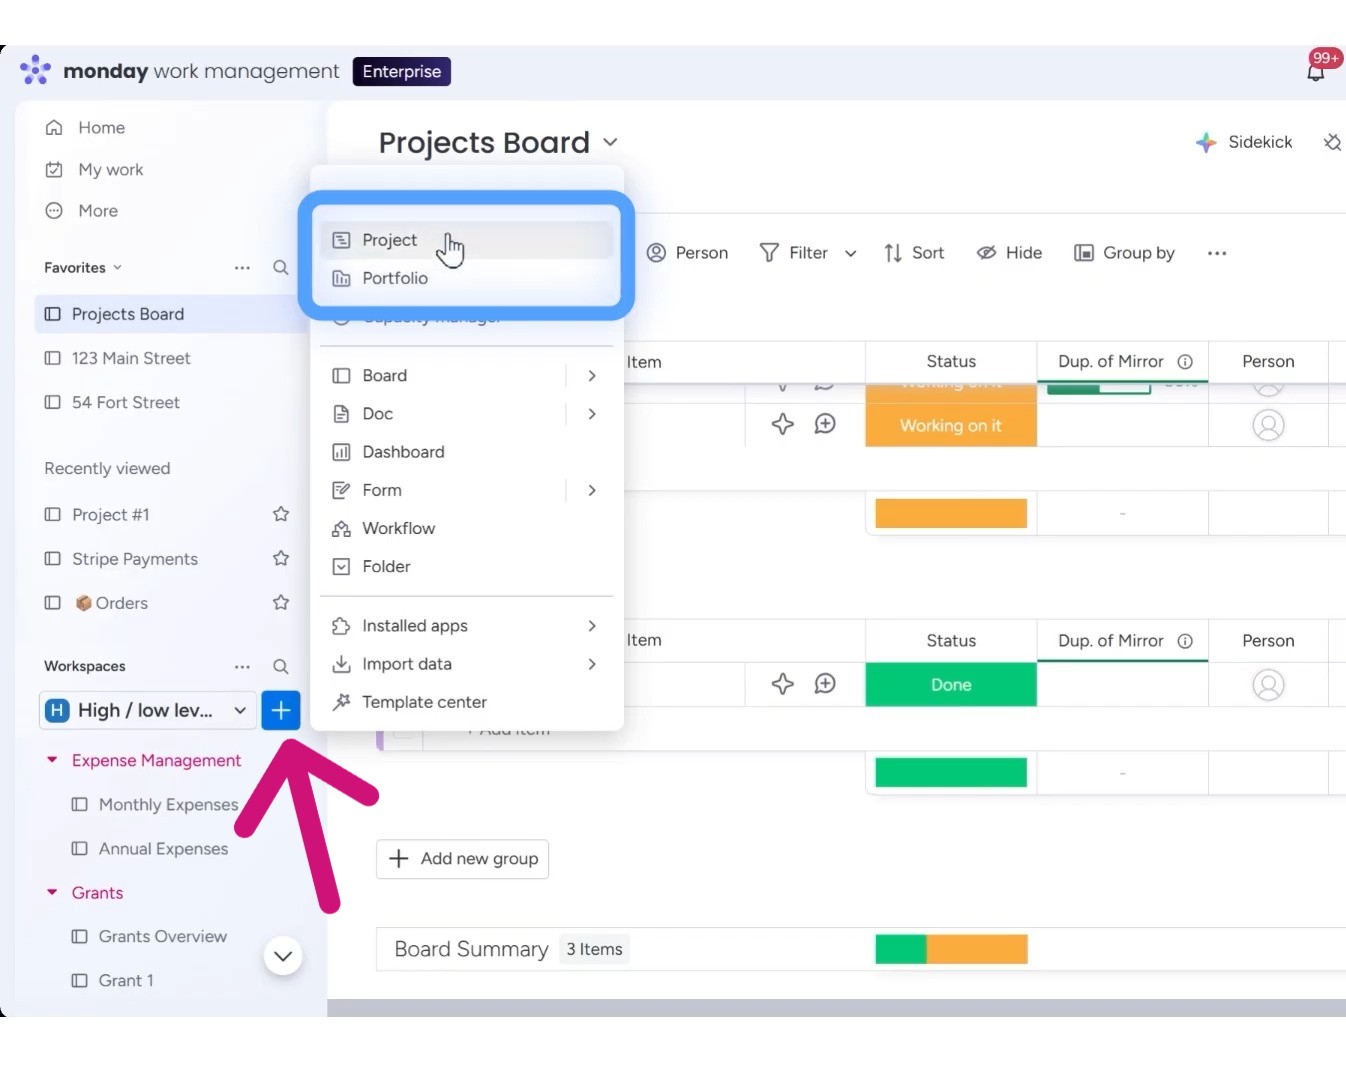
Here’s how to create one:
- Click the plus button in your workspace
- You’ll see options for “Project” and “Portfolio”
- Click “Portfolio” (I know, confusing, but this creates your portfolio)
- Rename it to something like “Projects” or “Properties”
This creates your high-level board, similar to the Projects board in method two, but with lot more features.
Adding Your First Project
Click to add your first project. There will be two options:
- Template boards: If every property follows the same process (and they usually do), create a template once with all standard tasks. Then every new property starts with that template automatically. Huge time-saver.
- Blank project: Start from scratch and build your task list as you go. Let’s say you create “123 Main Street” as a project.
After doing this, monday.com creates a low-level board for “123 Main Street” and connects it to your portfolio board. No manual connecting needed. When you go to that “123 Main Street” board, you’ll see the same connected board column.
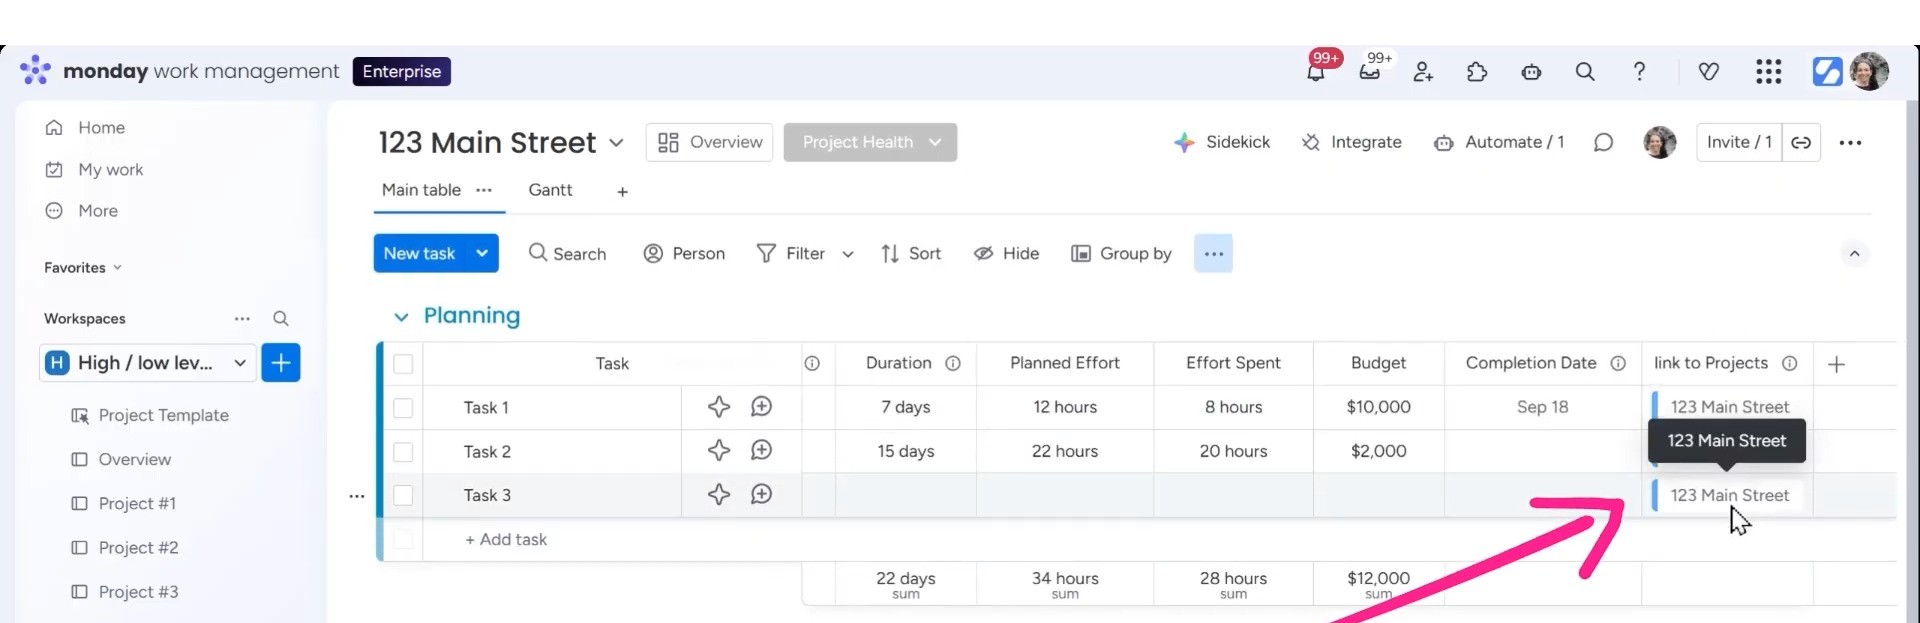
The Automatic Connection
Add a task to your “123 Main Street” board, let’s say “Get Permit.”
Go back to your portfolio board. That task is already there in the connected boards column.
Mark “Get Permit” as done on the property board. The portfolio board updates in real-time.
This eliminates the entire manual connection process from method two. Every property you add to the portfolio automatically links to its own board. Every task you add automatically shows up.
Advanced Features That Make Portfolio Worth It
Portfolio includes features you don’t get with regular boards.
Project Health column: Instead of just seeing percentages, you mark each project as:
- On track (green)
- At risk (yellow)
- Off track (red)
This feeds into a visual snapshot at the top of your portfolio. You see color-coded indicators for all properties at once, so scanning even 50 properties will take less than a minute.
You can also access the Snapshot view where you’ll get:
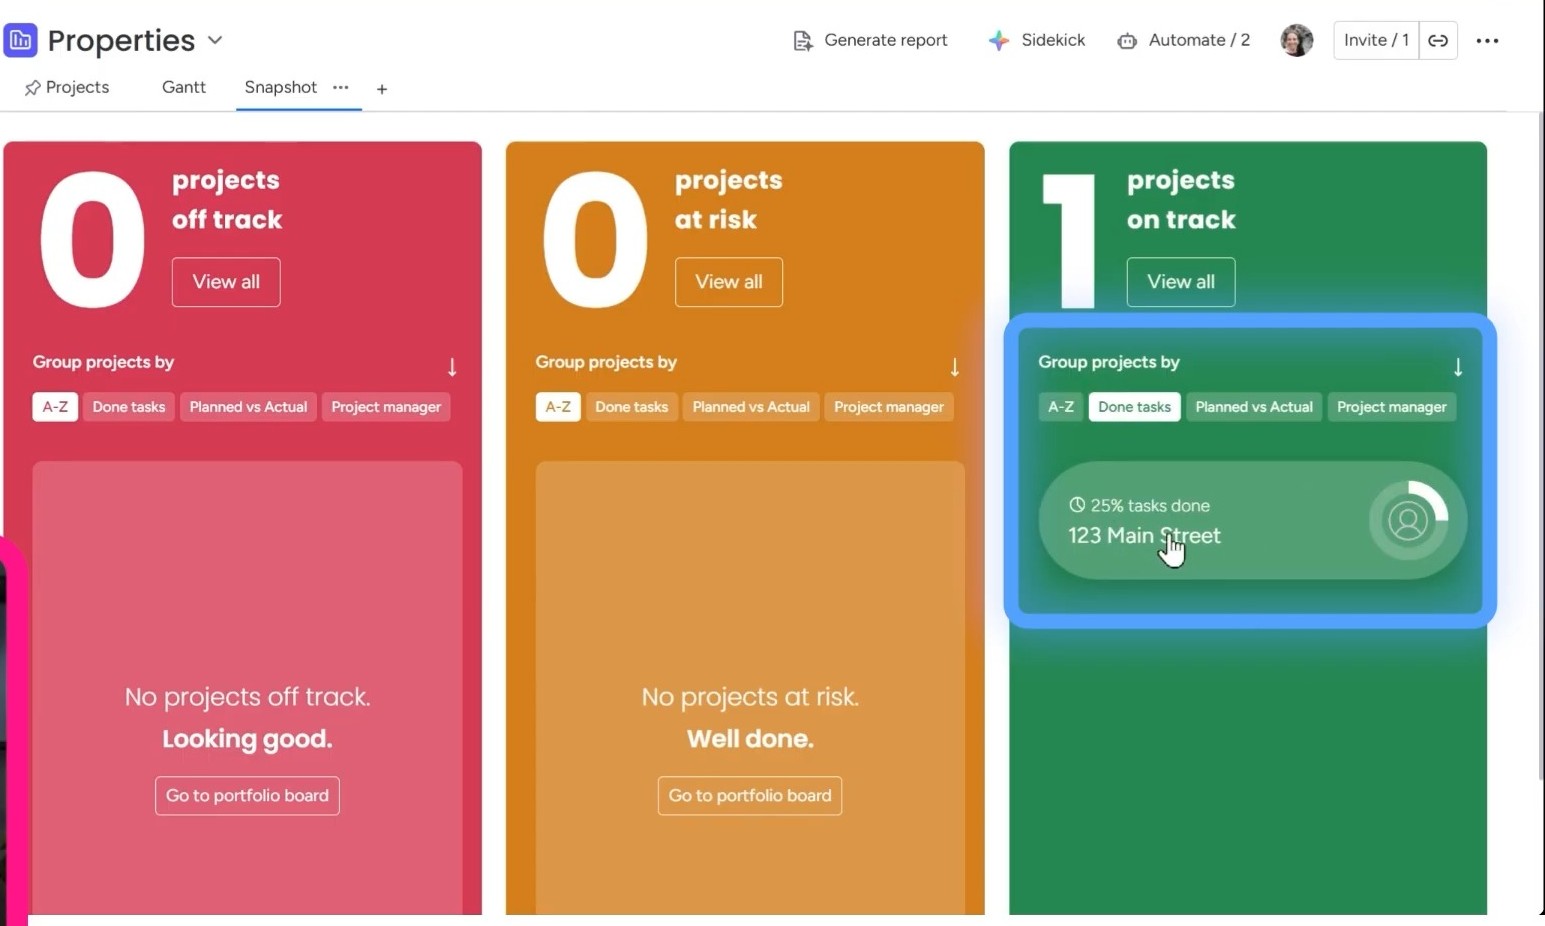
- Automatic progress tracking: You don’t need to set up progress columns. The portfolio calculates completion percentages automatically based on task statuses.
- Actual vs. planned dates: Add target dates to projects, and portfolio tracks whether you’re ahead or behind schedule.
- Project manager: See who’s working on what across all projects without opening individual boards.
There’s also a “Generate report” option on the top bar. Clicking on it will generate a comprehensive status report covering all your projects. No need for manual compilation or copying data into spreadsheets.
The Scalability That Changes Everything
Remember how method two caps you at 20-60 connected boards?
Portfolio currently handles around 100-200 projects, with monday.com working to increase this to 1,000 connected projects. And, you also get the advantage of connecting as many boards as you want to a dashboard.
For a high-level and low-level setup:
- Pro plan: You can only connect 10 boards to a dashboard.
- Enterprise plan: You can connect 20 boards to a dashboard.
So even on Enterprise with method two, your dashboard can only show data from 20 of your 60 connected boards.
Portfolio breaks this limitation. All your portfolio projects connect to one dashboard. Managing 150 properties? Your executive dashboard shows data from all 150.
Your leadership team opens one dashboard and sees the health, progress, and status of every project in your entire business.
Who This Works For
Portfolio makes sense when you’re:
- On the Enterprise plan (it’s not available otherwise)
- Managing 50+ projects
- Scaling toward 100+ projects
- Running a business where executives need instant visibility across all projects
- Working with templates (same process for each project)
The automation alone saves hours every week. The scalability means you won’t outgrow the system.
So Which Method Should You Actually Use?
Here’s my honest recommendation:
Start with Method 1 (single board with items and sub-items) if you’re managing fewer than 15 projects. It’s fast to set up, easy to understand, and gets you tracking projects within 10 minutes.
Upgrade to Method 2 (high-level and low-level boards) when you hit 15-20 projects or when your task lists get so detailed that your single board feels overwhelming. You’ll know it’s time when you’re constantly scrolling to find things.
Move to Method 3 (portfolio) if you’re on Enterprise and managing 50+ projects. You don’t have to face the pain of manual connections and board limitations in this method.
You can migrate between these methods as your business grows. Start simple, scale up when you need to.
Ready to Implement monday.com the Right Way?
Simpleday helps businesses design, build, and optimize monday.com workflows that actually work. Stop guessing at the best setup. We’ll analyze your projects, recommend the right tracking method, and implement a system that scales with you. Book a consultation today.