
Manually sending emails every time an order ships, a client signs up, or a payment is due? That must have been taking a few hours everyday.
But you can automate these emails in monday.com. Whether you use Gmail or Outlook, you can set up integrations that send the right message at the right time.
This tutorial walks you through three practical ways to connect your email to monday. Each method uses a different trigger, so you can pick the one that fits your workflow.
If you want to watch the whole process, check this video tutorial:
Things You Need Before You Start
Make sure you have:
- A monday.com account with a board set up
- Access to Gmail or Outlook
- The relevant columns on your board (email addresses, status, dates, etc.)
If you haven’t connected your email provider to monday yet, don’t worry. The platform will walk you through the connection process when you set up your first automation.
Now, let’s get into the three integration methods.
Method 1: Send an Email When a Status Changes
This is one of the most common automations. It works well for any workflow where a status update should trigger communication — think order shipments, project approvals, or task completions.
The Use Case
Let’s say you run an e-commerce business. When an order’s status changes to “Shipped,” you want to automatically email the customer with their tracking information.
Setting It up
Your board should have:
- A Status column (e.g., “Order Status” with options like New, In Progress, Shipped)
- An Email column with the customer’s email address
- A Tracking Link column (or any other info you want to include in the email)
Here’s how to create the automation:
Step 1: Click the Integrate button at the top of your board. This opens the Integration Center.
Step 2: Select your email provider (Gmail or Outlook). If this is your first time, you’ll be prompted to connect your account.
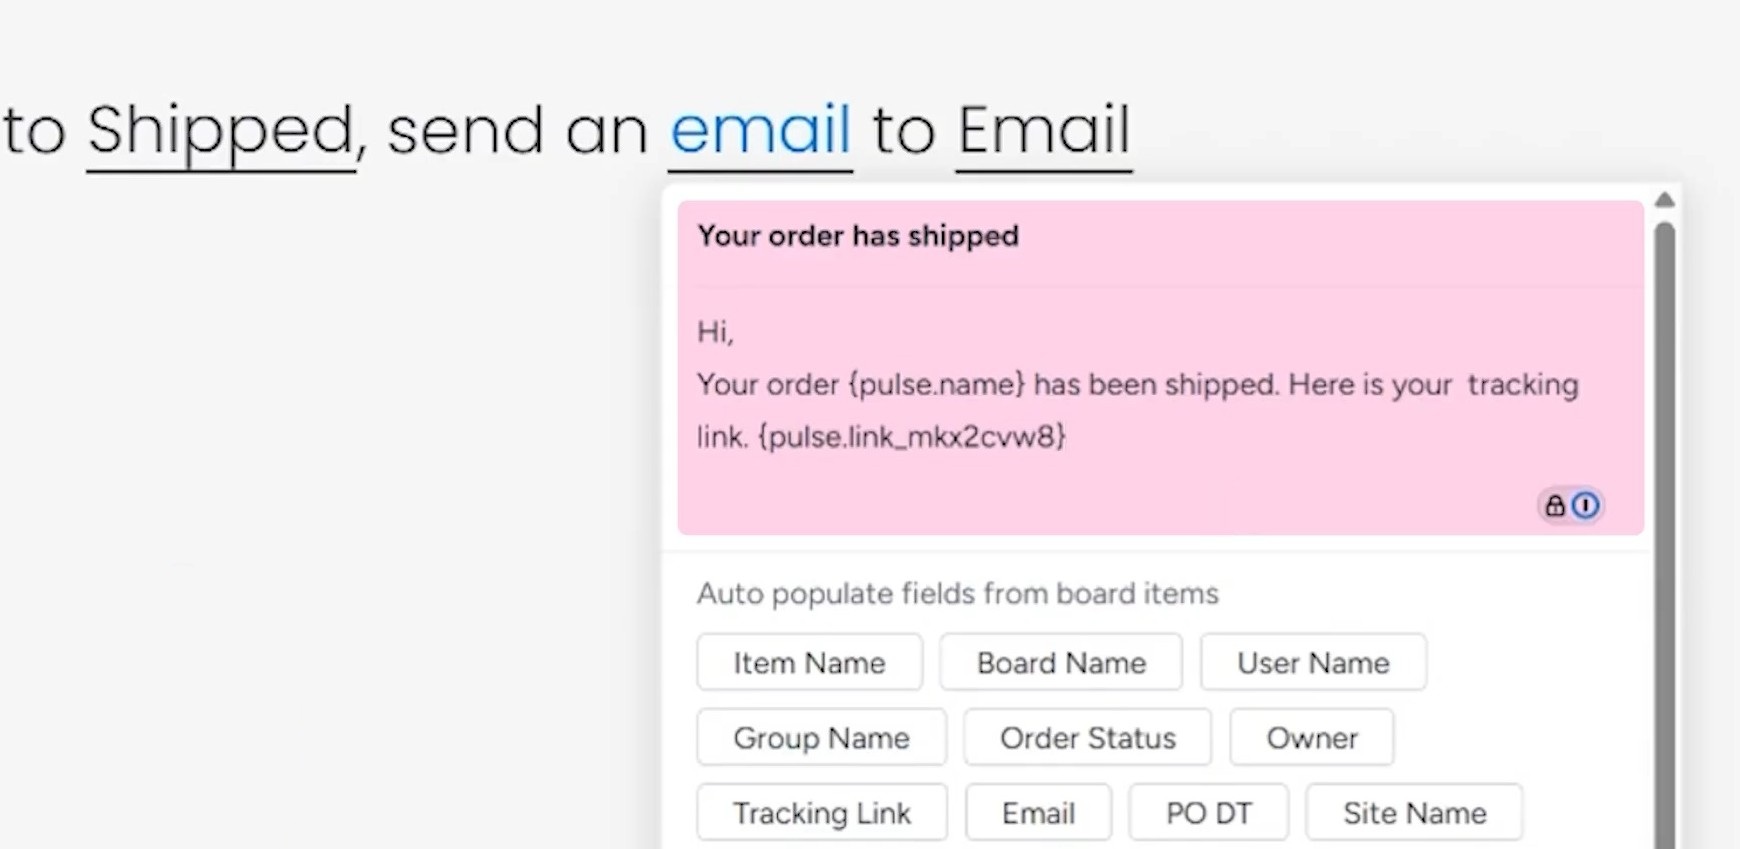
Step 3: Find the recipe that says: “When status changes to something, send an email to someone.” Click Use Template.
Step 4: Configure the trigger. Click on “status” and select your status column (e.g., Order Status). Then, choose the specific status that should trigger the email (e.g., Shipped).
Step 5: Set the recipient. Click “someone” and choose your Email column.
Step 6: Write your email. You’ll see a subject line field and a body field. Use the placeholders to pull in dynamic information from your board.
For example:
- Subject: Your order has shipped
- Body: Hi, your order {Item Name} has been shipped. Here is your tracking link: {Tracking Link}
Step 7: Click “Create automation.”
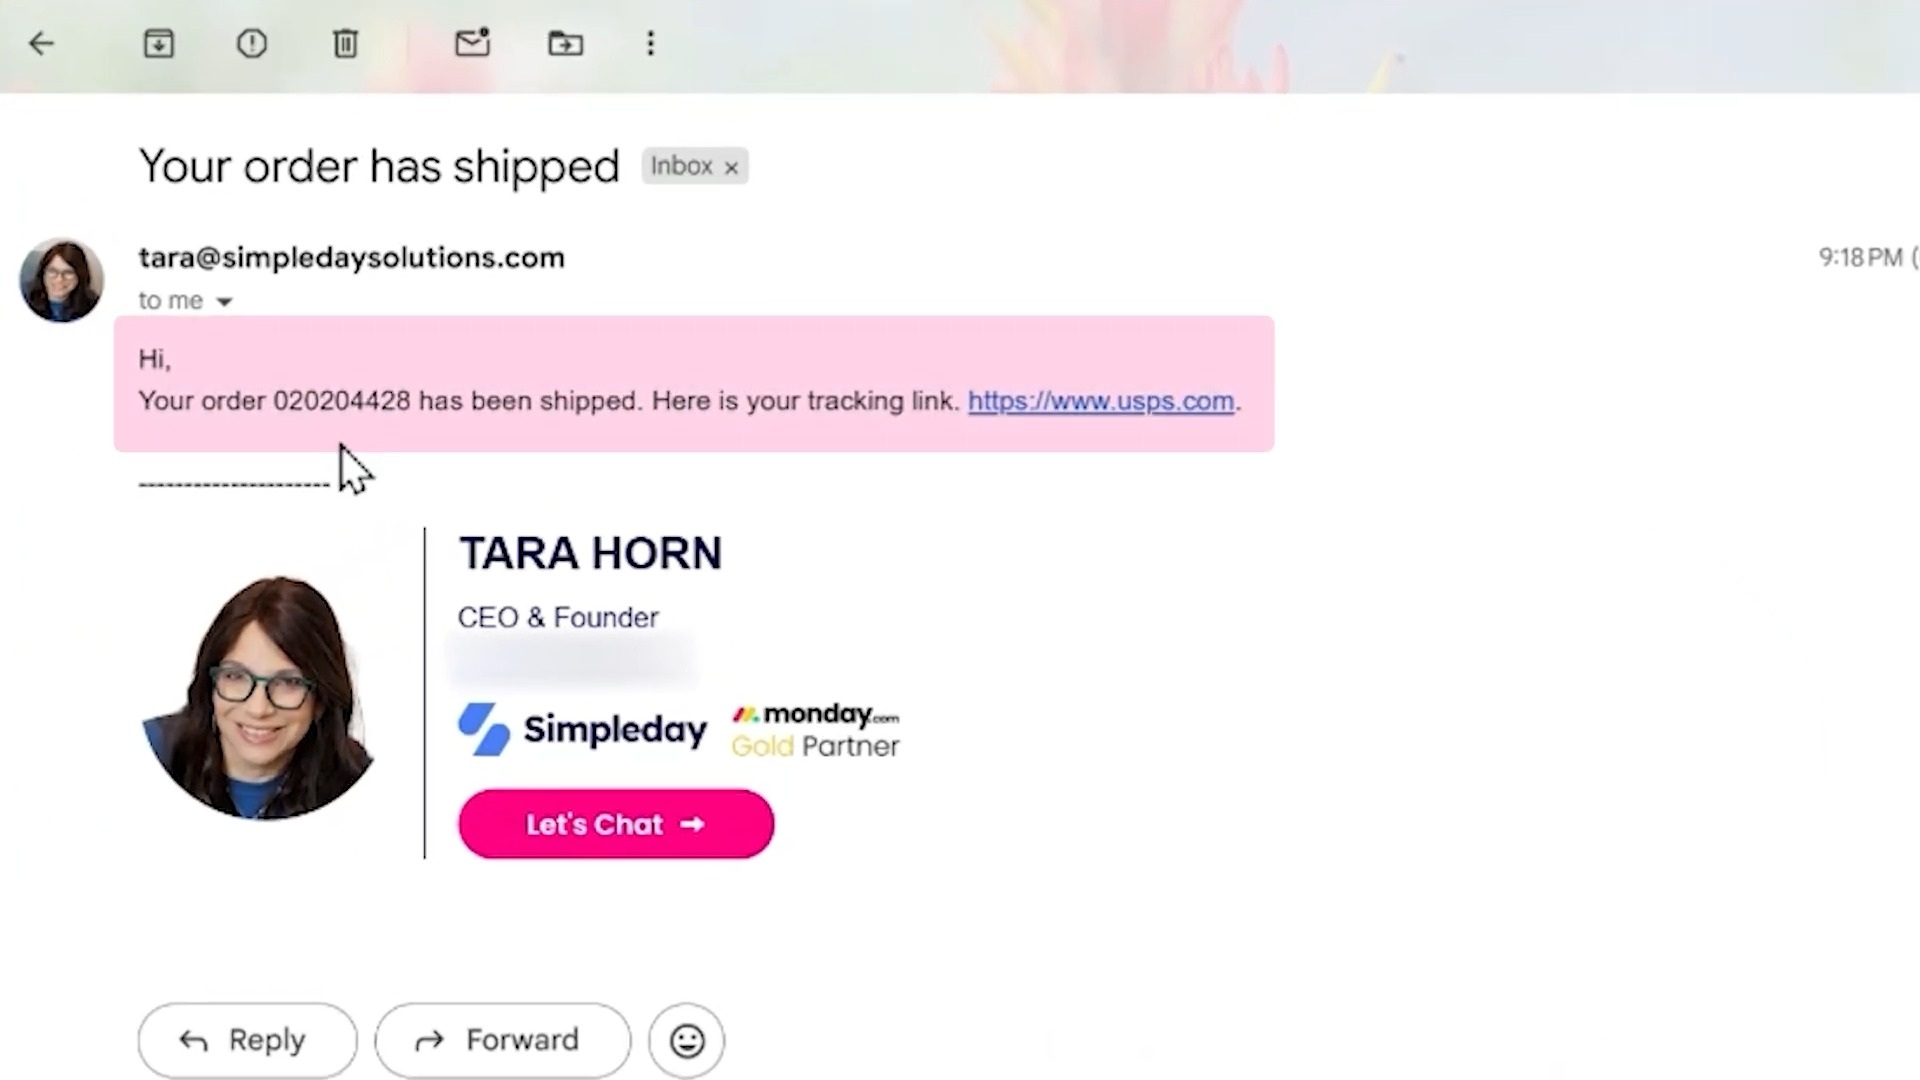
Testing It
Change an item’s status to “Shipped” and check your inbox. You should receive an email with all the dynamic content filled in.
Method 2: Send an Email When an Item Is Created on a Board
This automation is perfect for onboarding sequences, order confirmations, or any situation where adding a new item to your board triggers an email.
The Use Case
Imagine you have a board tracking payments. Every time a new payment comes in (a new item is added), you want to send the client onboarding instructions or a confirmation email.
Setting It up
Your board needs an Email column, so the automation knows where to send the message.
Step 1: Click Integrate and select your email provider.
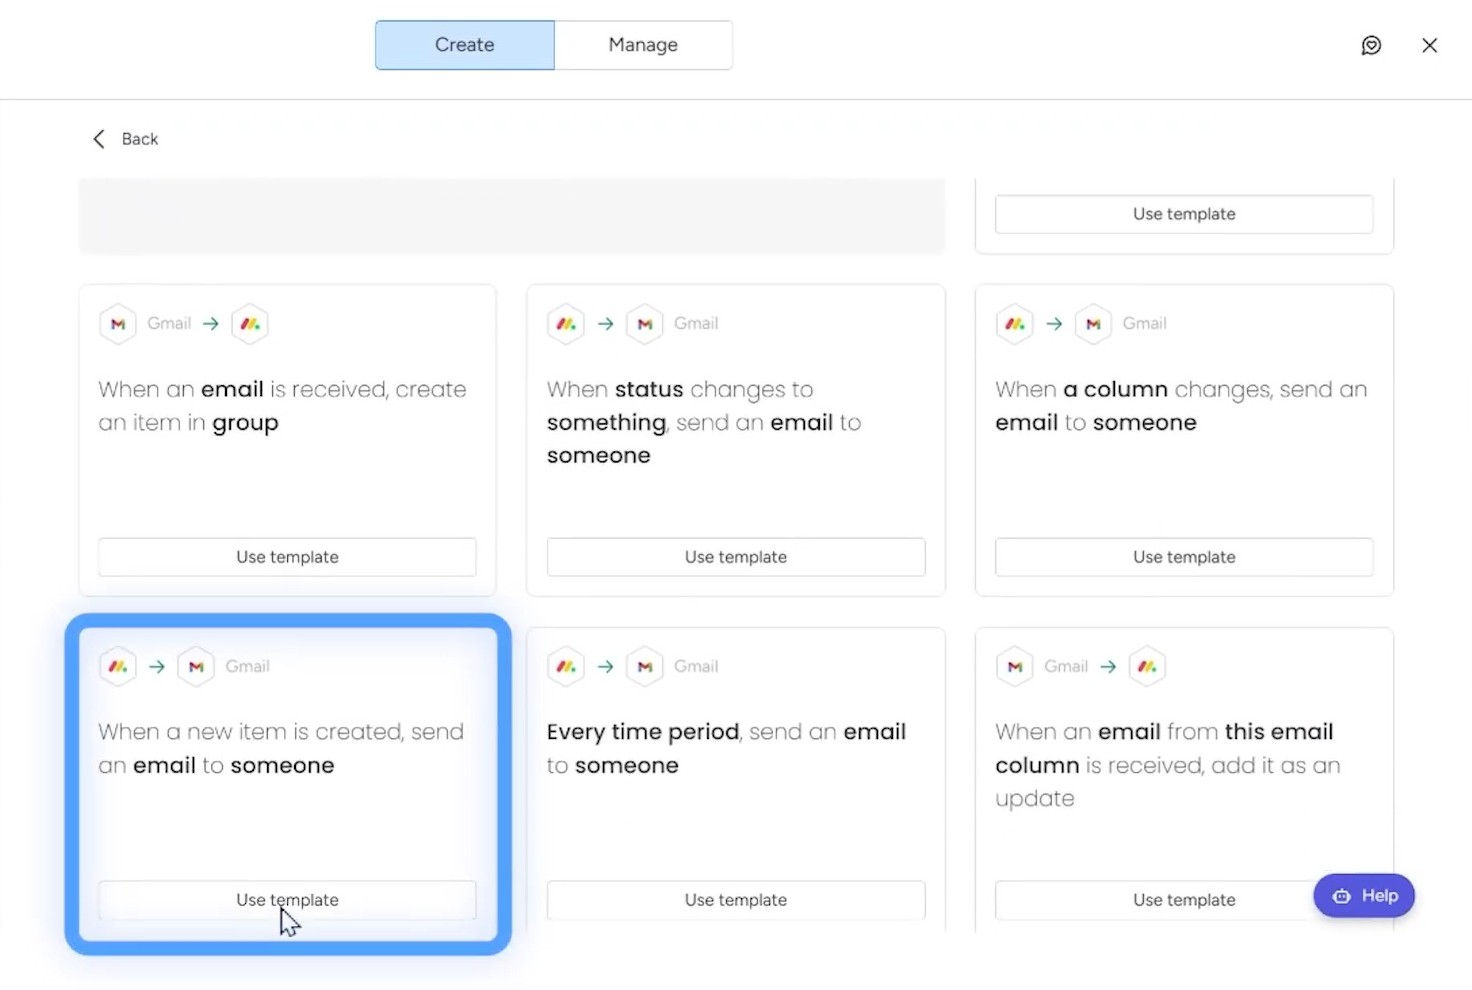
Step 2: Find the recipe: “When an item is created, send an email to someone.” Click Use Template.
Step 3: Select the Email column as the recipient.
Step 4: Write your email using placeholders to personalize the message.
Step 5: Click “Create automation.”
Now, every time you (or an integration) adds a new item to this board, an email goes out automatically.
Adding Conditions for More Control
What if you need to send different emails based on the type of client or product? You can build a custom automation with conditions.
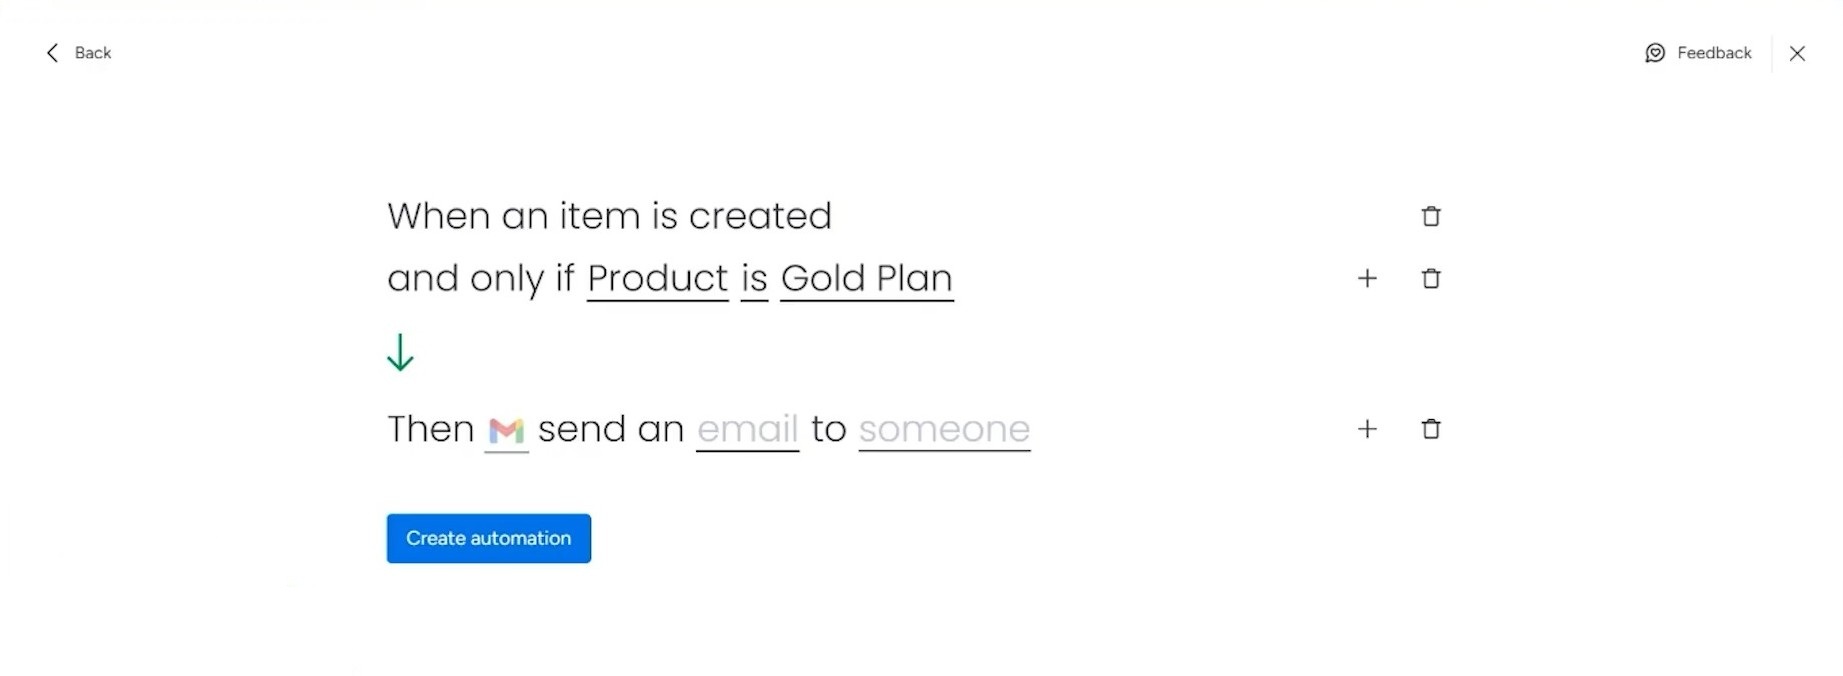
Step 1: Instead of using a preset recipe, click the “Create automation” option.
Step 2: Set your trigger: When item is created.
Step 3: Add a condition. Click the + icon and select Only if. For example: Only if “Product” equals “Gold Plan.”
Step 4: Add your action: Send an email (search for Gmail or Outlook).
Step 5: Configure the email and save.
You can create multiple automations with different conditions to send tailored emails to different customer segments.
Method 3: Send an Email Based on a Date Column
Date-based automations are great for reminders, such as upcoming renewals, payment due dates, project deadlines, or follow-ups.
The Use Case
You have clients on a subscription model. Your board has a “Next Payment Date” column. You want to send a reminder email one week before each payment is due.
Setting It up
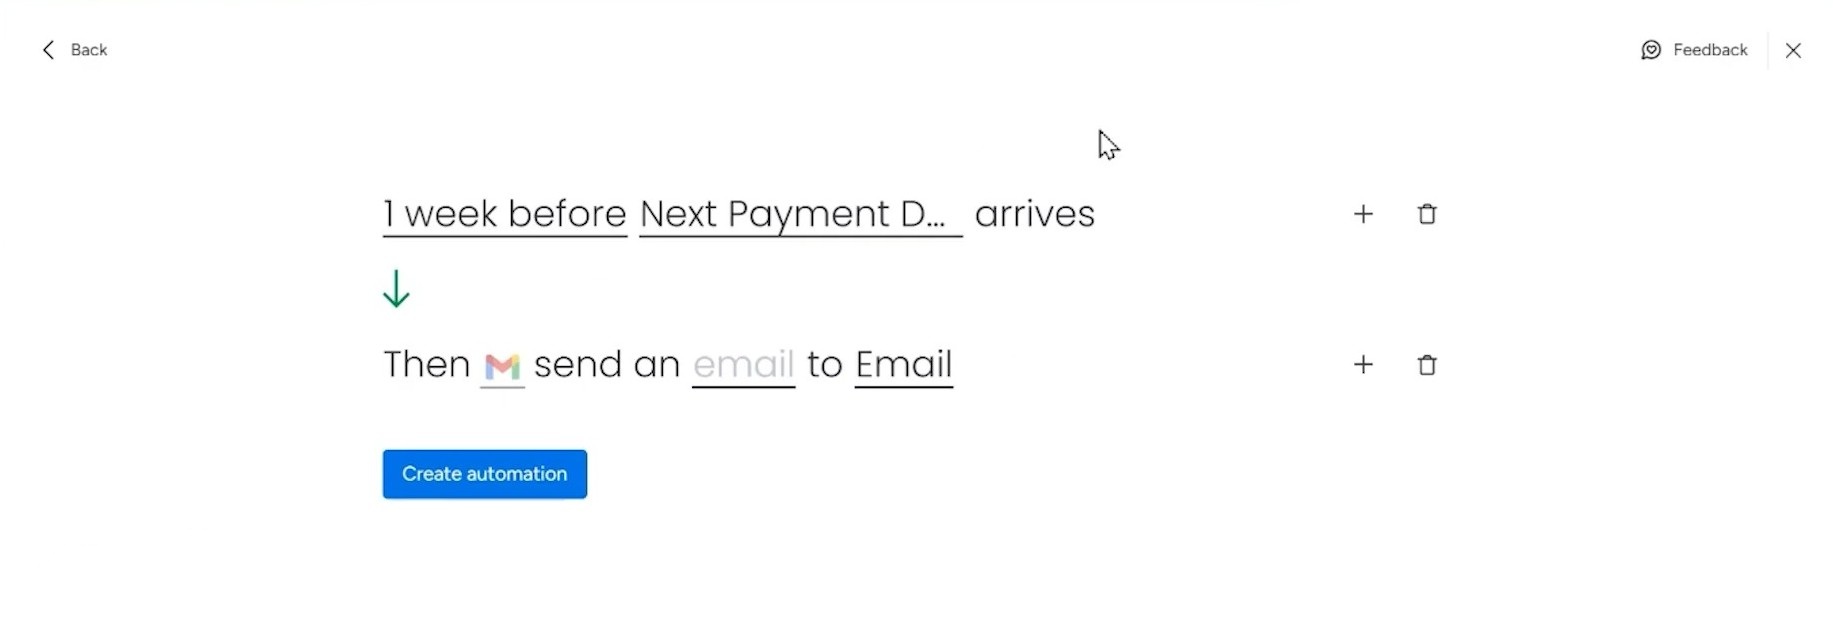
Step 1: Click Automate and select “Create from scratch” to create a custom automation (since we need more flexibility with timing).
Step 2: Click When this happens and search for “date.” Select When date arrives.
Step 3: Click on the trigger to configure timing. Select 1 week before and choose your date column (e.g., Next Payment Date).
Step 4: Add your action. Search for Gmail or Outlook and select Send an email.
Step 5: Choose the Email column as the recipient and write your reminder email.
Step 6: Click “Create automation.”
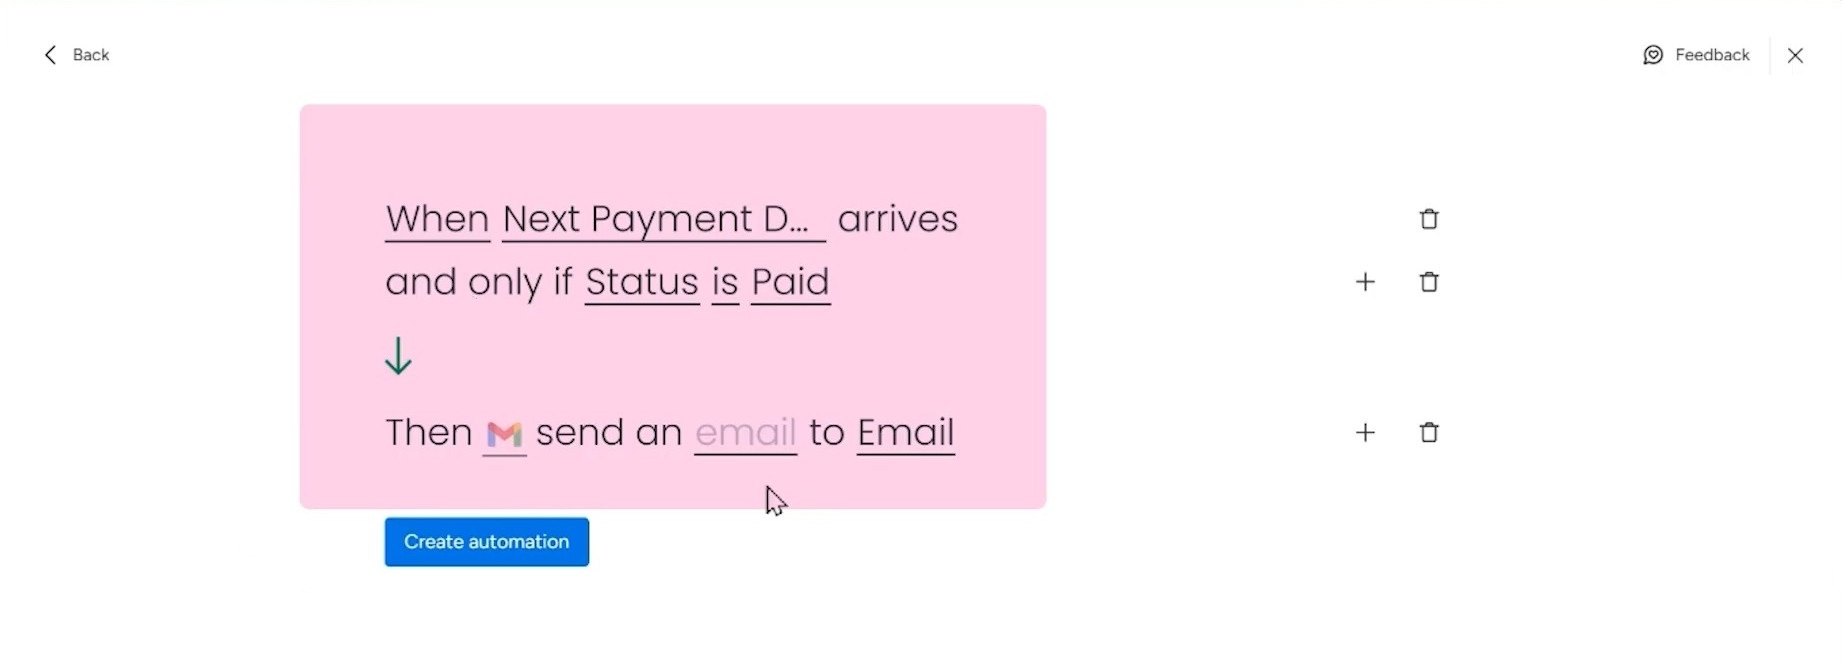
Adding Extra Conditions
You can make this smarter by adding qualifiers. For example, only send the reminder if the client’s status is “Active” or “Paid.”
To do this, add an Only if condition between your trigger and action:
- When date arrives → Only if Status is “Paid” → Send an email
This prevents emails from going to churned clients or accounts on hold.
Quick Recap
Here’s a summary of the three triggers and when to use them:
| Trigger | Best For |
|---|---|
| Status changes | Shipping notifications, approval emails, stage-based updates |
| Item is created | Onboarding emails, order confirmations, welcome messages |
| Date arrives | Payment reminders, renewal notices, deadline alerts |
Each of these can be enhanced with conditions to send different emails to different people based on your board data.
If your automations get complex with multiple conditions or different emails for different scenarios, consider using monday.com’s Workflows feature. It lets you consolidate multiple automation paths into a single, visual workflow instead of creating dozens of separate automations.
Start Automating Your Emails
These three integrations cover most email automation needs. Start with one, test it, and build from there. Every automated email is one less manual task on your plate.
Need help setting up monday.com the right way? At Simpleday, we help businesses build workflows that actually work. Whether it’s email automations or full-scale system implementations, we’ll get monday running smoothly for your team. Get in touch to see how we can help.