If you use monday.com a lot, you’re likely aware of how useful automations can be. Automations in monday.com can simplify your work, save you time, and minimize the chances of mistakes. But what if you have multiple boards with comparable tasks and want to copy your automations? Is there a way to do that so you do not need to recreate all of your automations manually? What if you use the same automation for every board?
Don’t worry – you do not need to do everything manually. In this article, we will guide you on the process of creating and utilizing automation templates in monday.com. This feature is designed to assist you in replicating your automations seamlessly across different boards, thus saving you valuable time and effort.
Before we delve into the step-by-step process of how to make automation templates, I would like to stress that if you have two boards that you know are going to be similar and have the same automations, I would recommend creating and completing one first and then just duplicating that board. This way, you have all of the same automations and do not need to recreate them.
Now, let’s learn how to create automation templates in monday.com. This process is straightforward and can be accomplished with the following steps:
1. Create a Custom Automation
First, go to the board where you want to create an automation template. Click on create custom automation.

2. Choose a Trigger
Next, choose a trigger that will activate your automation. A great example is “When status changes to something” , this means that when a status column changes to a certain status, you will start the automation.
3. Set the Action
Now, set the action you want to perform when the trigger is activated. In our case, we want to move the completed task to the completed group on our board. So, we’ll select “Move item to group” and choose “Completed” as the group.
4. Click create automation.
This will save your automation, and if you look at the board automations, you will see it listed in the list of all of the board automations.
5. Save as Template
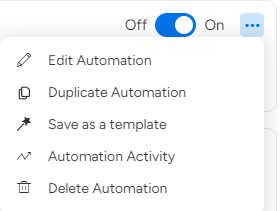
Once you’ve created your automation, click on the three dots in the top right corner and select “Save as Template.” Give your template a name that describes its purpose, such as “Completed Items Move to Completed Group.”

Now, your automation template is ready to use. Here’s how you can access it:
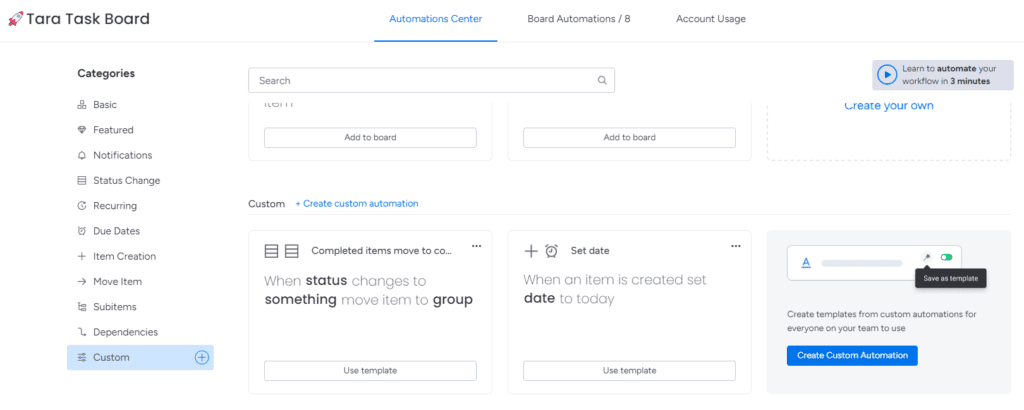
1. Open the automation center on the board that you are creating our automation in. You need to click on the “Automate” Or “Workflow” button in the top right hand corner of your screen.

2. Scroll to the bottom of the automation center or you can click on the word custom on the left side navigation menu.

3. Select the Template
In the Automation Center, you’ll see a list of all your automation templates. Choose the one you want to use by clicking on it.
4. Fill in the Blanks
The template will appear with all the details you’ve already set up. However, some fields will be grayed out because they need to be filled in with board-specific information.
5. Save and Test
Once you’ve filled in all the necessary information, save your automation and test it to make sure it works as intended. Congratulations! You’ve just used an automation template in monday.com.
In conclusion, automation templates are a powerful tool that can save you time and effort when setting up similar workflows in different boards. By creating a template once, you can reuse it over and over again with just a few tweaks.
So, next time you’re configuring a new board in monday.com, it is important to check whether you have an existing automation template that can simplify the process and accelerate your progress. This will save you valuable time and effort in setting up new boards and reduce the likelihood of errors or inconsistencies in your automations.


