When you’re running a business dealing with physical goods, keeping tabs on your inventory is crucial. You must know what products you have in stock, where they’re located, and where they’ve been shipped off to. It’s a difficult act, as misplacing items can lead to unhappy customers and a hassle of finding missing merchandise.
I’ll explain how you can keep track of your inventory and shipping by using monday.com.
I’ve explained the whole process in this YouTube video. Check it if you prefer video tutorial:
https://www.youtube.com/watch?v=Z1VqGn-XtVg
Understanding the Workflow
Before we get into the details, let’s set the background. The workflow we’ll dive into today revolves around a company creating banners, booths, and other display materials for trade shows and events. Each piece belongs to a specific client who may need it shipped out for an upcoming show or conference.
When a client asks for a product, the company then tracks the inventory location. Can you imagine the nightmare of losing track of a client’s trade show display? Neither can they! That’s why knowing the exact location of every item is critical, whether it’s tucked away in their warehouse or out being used at an event.
The next step of the workflow is starting the shipping process. A client reaches out saying “Hey, remember that 10×10 booth I had you make last year? I need that for the BigCorp convention next month.” The company has to quickly locate that booth, prepare it for transit, and ship it to the address.
Keeping meticulous records isn’t just nice-to-have, it’s make-or-break for keeping clients happy and their events running smoothly.
How to Set up the Boards on monday.com
The whole system revolves around two main boards on monday.com:
Inventory Board
Shipping Board
By syncing these boards together, you get a complete picture of what’s in stock and what’s out for delivery.
1. Inventory Board Setup
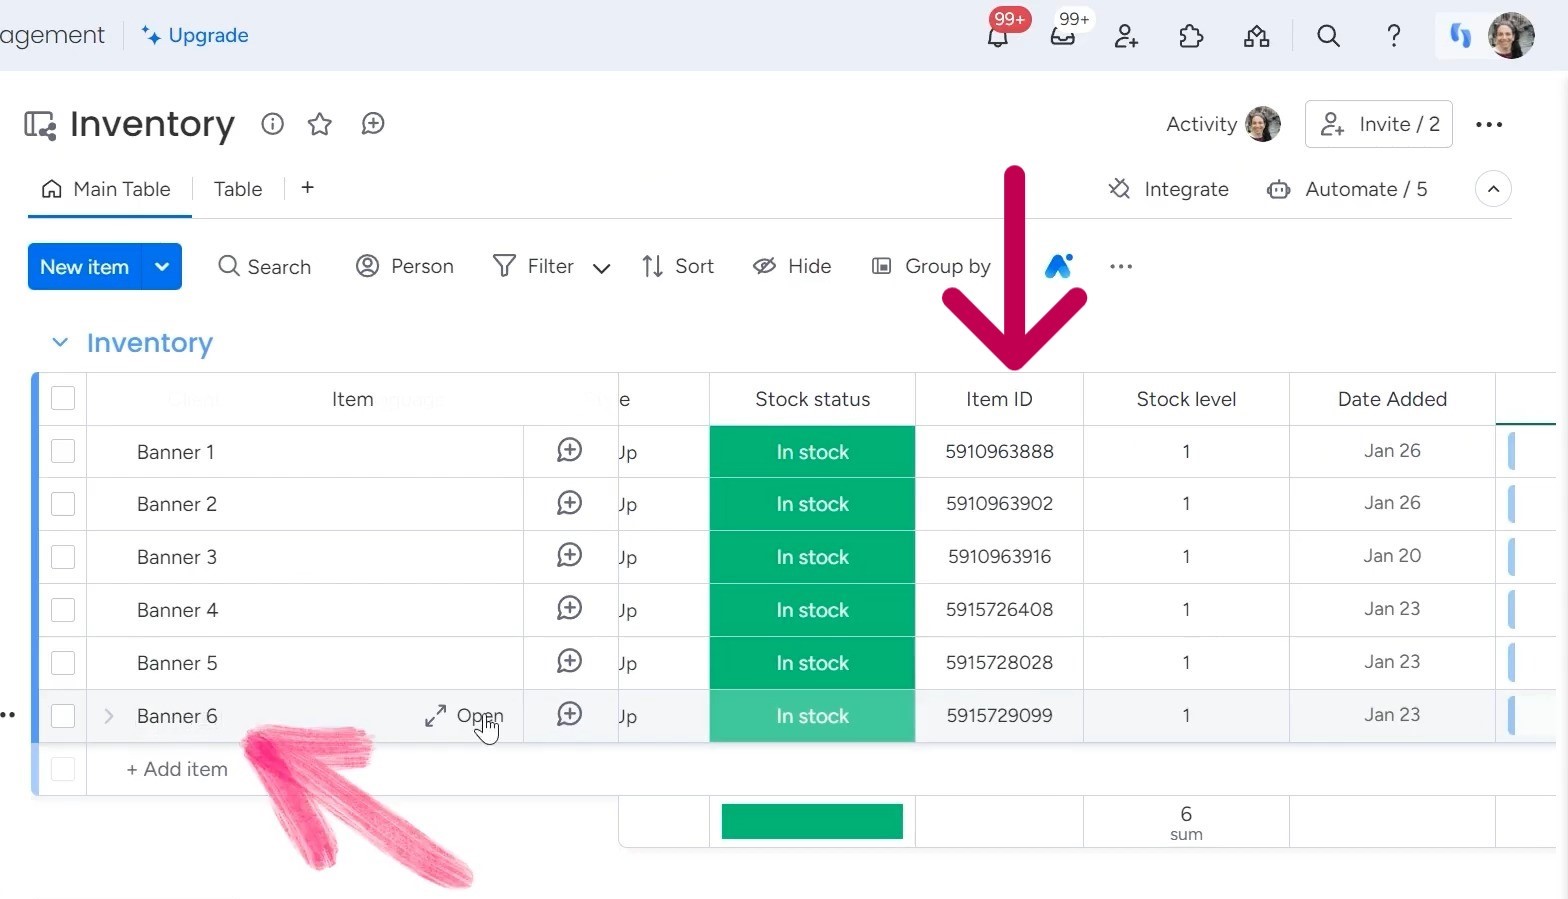
The Inventory Board contains all the key details on the banners, booths, and other items you’re storing for clients.
Item details (language, style, etc.) – You’ll want columns for the essential item details like the language, design style, and any other crucial descriptors.
Stock status and item ID columns – A stock status column lets you flag if an item is currently in stock or out. And the item ID numbers are great for keeping track of inventory in a scalable way. These automatically generated ID numbers are unique to specific products.
Stock levels and date added – Of course, you’ll also want to know quantities and when items originally came into your possession. Having stock level and date added columns gives you those insights with a single glance.
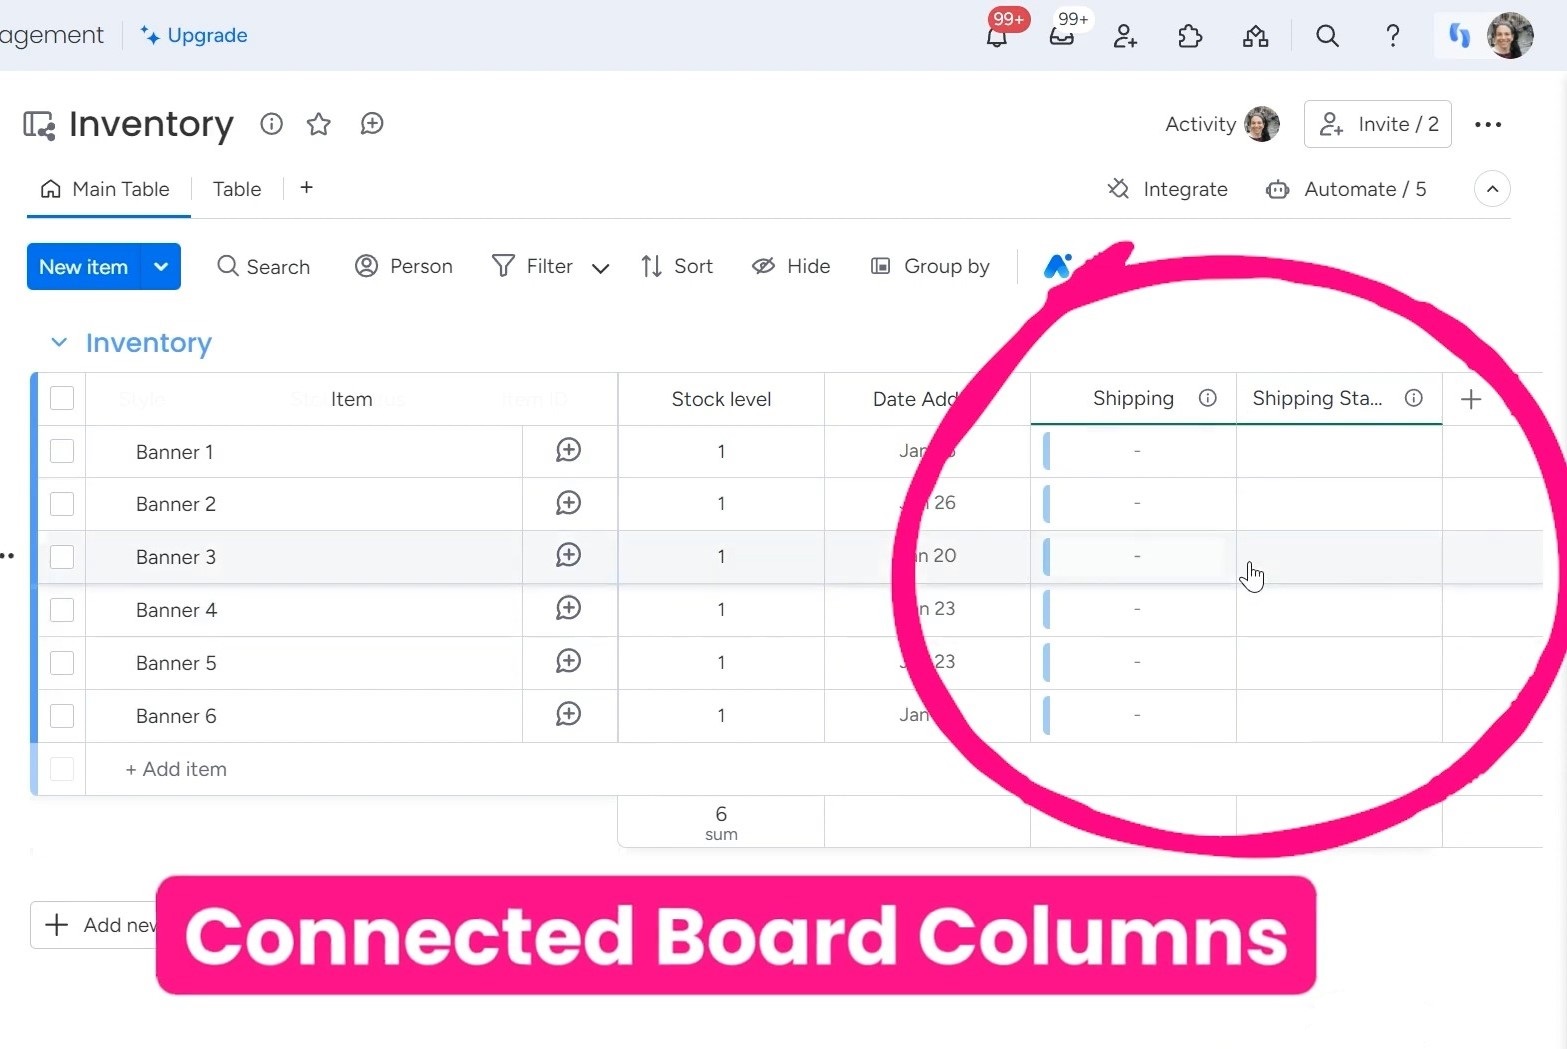
Connected board columns to Shipping board – Last but not least, make sure to link up the Inventory Board to the Shipping Board. When an item gets ready for shipment, the Inventory Board will automatically sync with what’s happening over on the shipping side.
2. Shipping Board Setup
Now that Inventory is locked down, we’ll move to setting up the Shipping Board.
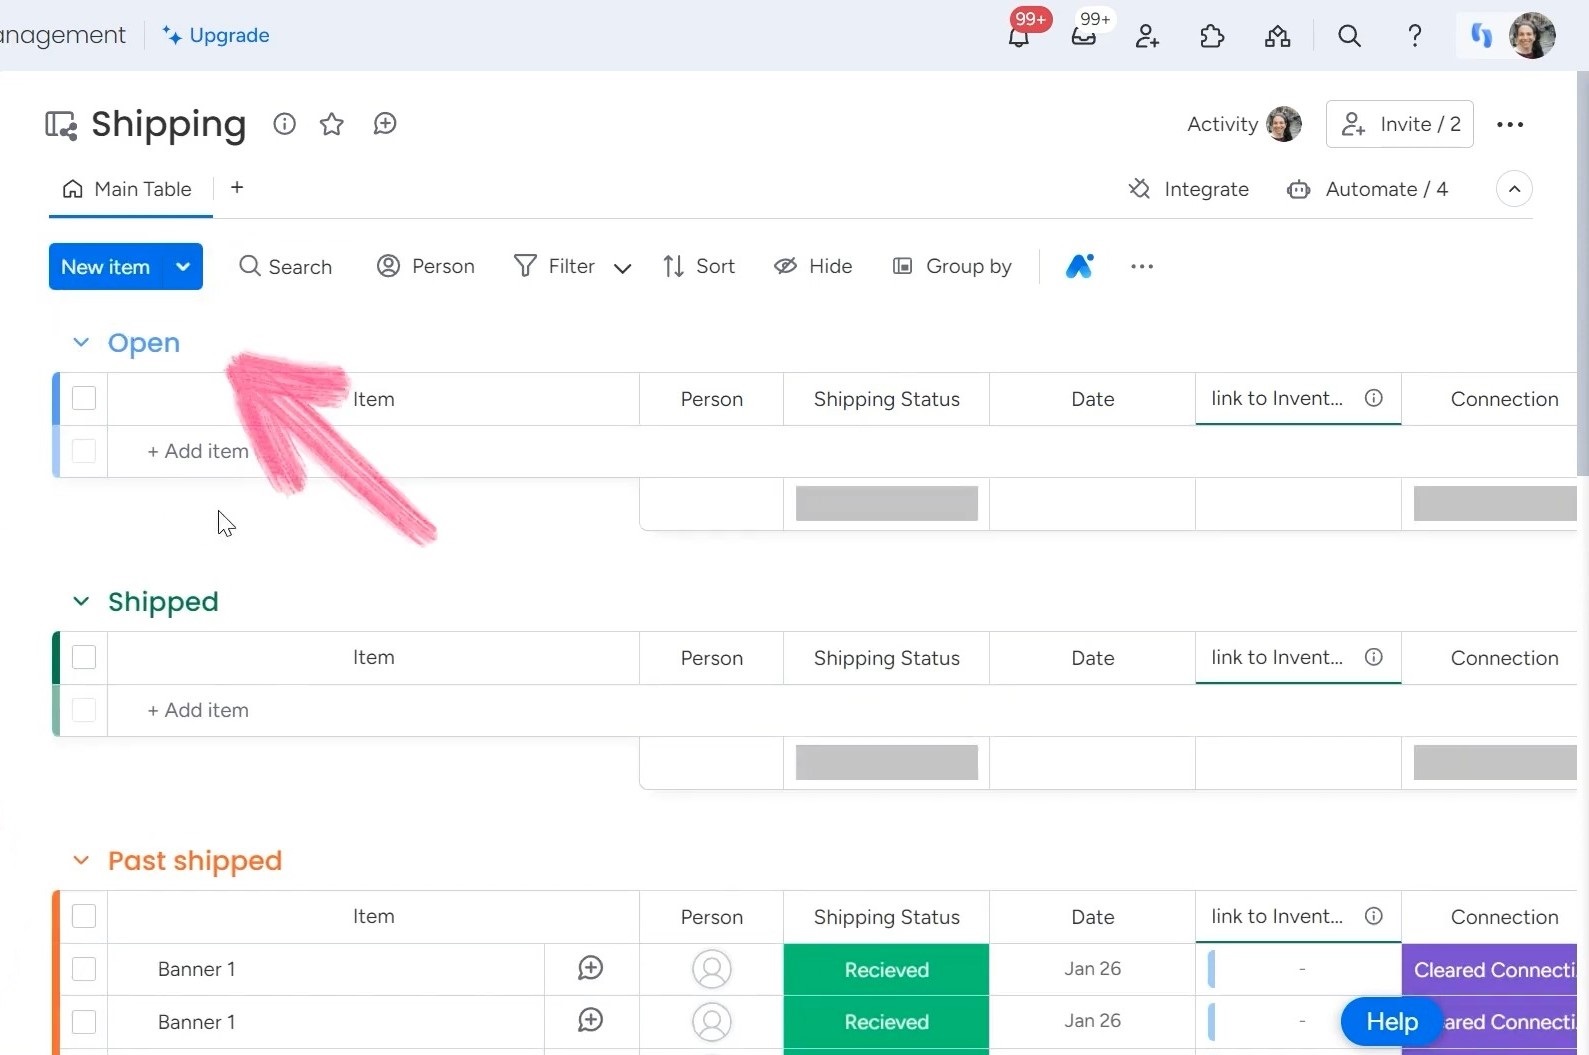
Groups for open and shipped items – The Shipping Board is your command central for items in transit. Map out separate groups to instantly visualize what needs to go out versus what’s already been delivered.
Shipping details (tracking number, updates) – And of course, you’ll want all the key shipping details, including tracking numbers, last updates, pretty much everything the logistics team needs to stay on top of those shipments.
By tying these two boards together with some automations, this entire inventory-to-shipping process becomes a seamless system.
The Inventory and Shipping Workflow Process
So, the company’s workflow from setting up the inventory to shipping and receiving it back is quite straightforward.
It all starts when a client requests for an item. For example, they may request you to ship out a “Go Big or Go Home” banner for an upcoming event. You’ll then look up that item in your inventory.
After delivering that item, you’ll mark that product as “shipped” on the Inventory Board. This will trigger an automation that creates a corresponding entry on the Shipping Board, automatically linking the two entries together.
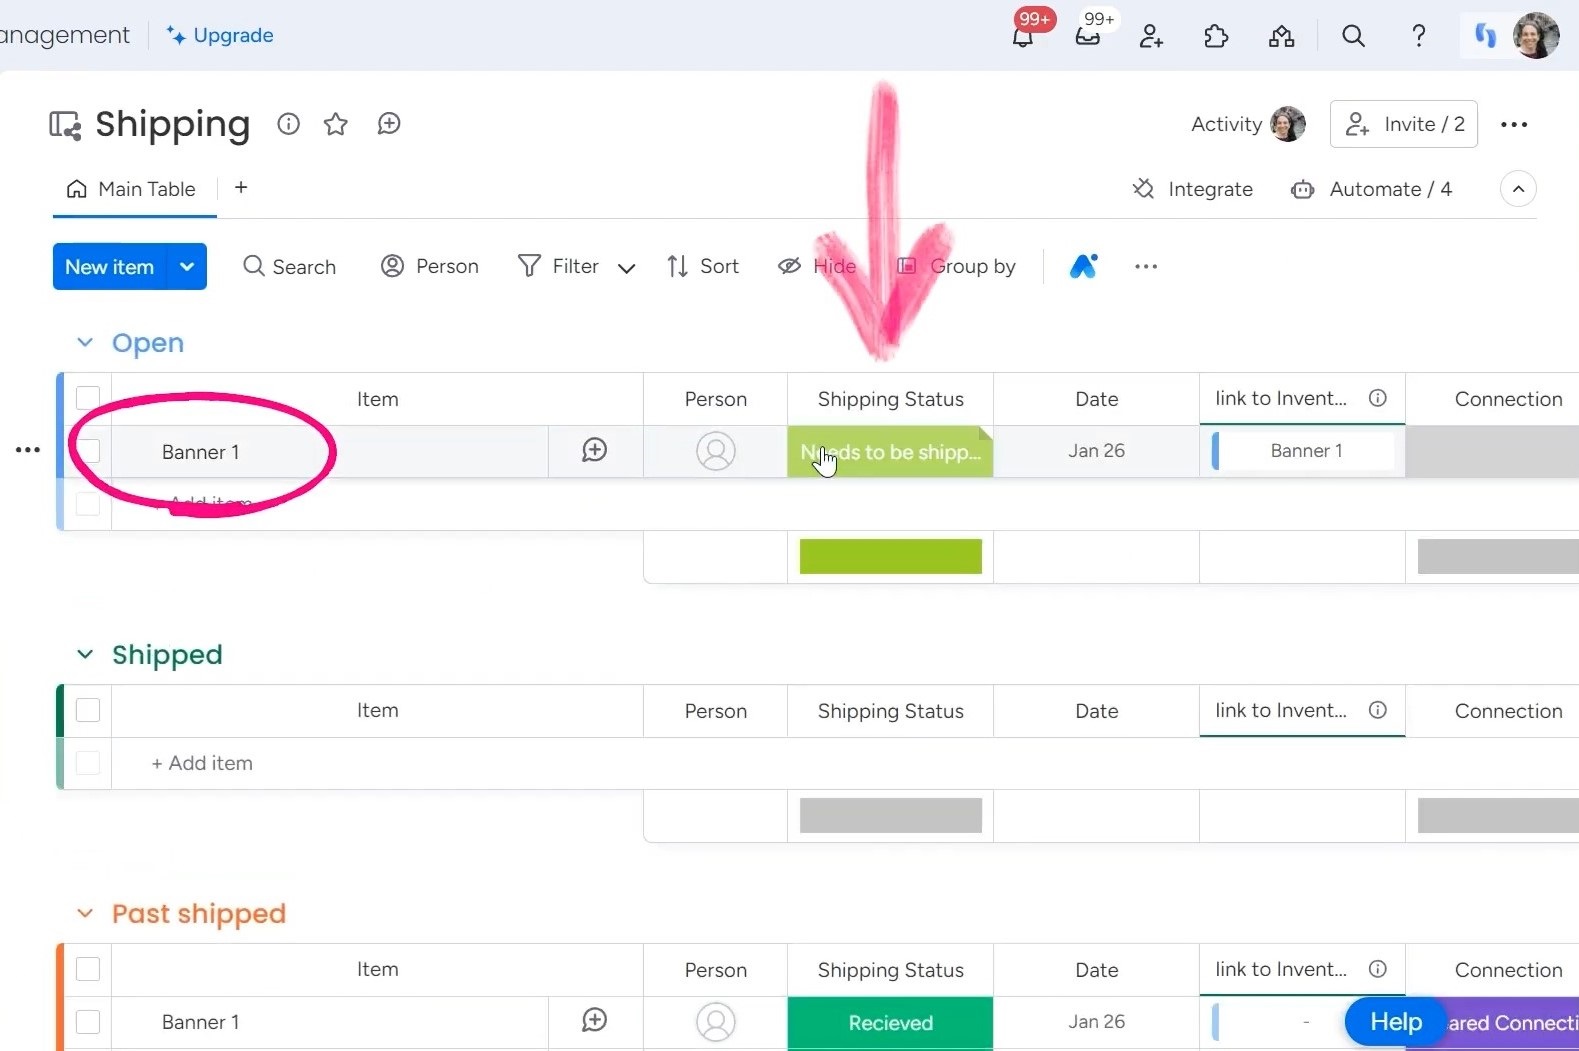
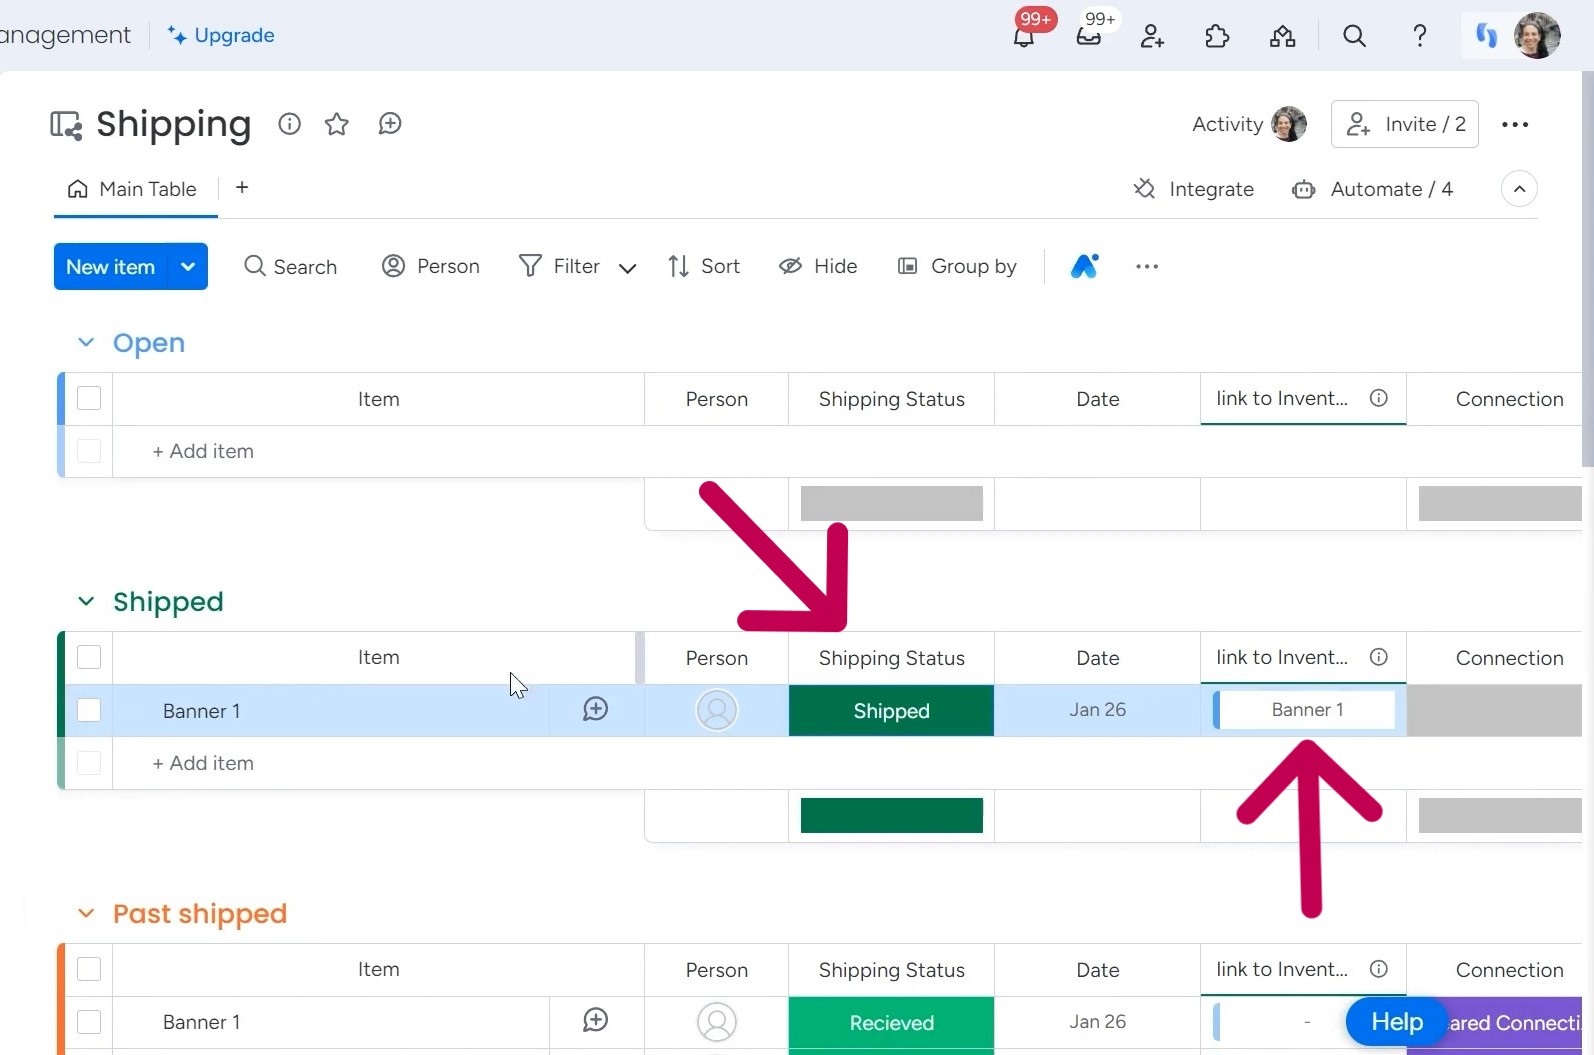
If we take a look at the shipping board, you’ll see that the item (let’s say Banner #1) has been added with a “Needs to be shipped” status, along with a date and a link back to the original Inventory Board entry.
Now, the shipping manager can handle all the necessary preparations for shipping the item. They can enter details, like the courier and tracking number, directly on the Shipping Board. There’s also a log that shows the last update and creation details.
Once everything is ready, the manager can change the shipping status to “Shipped” on the Shipping Board.
This action will move the item to the “Shipped” group, maintaining the connection to the original Inventory Board entry.
Let’s circle back to the Inventory Board. Remember Banner #1? You’ll notice that its status has now been updated to “Out of stock” since it’s been shipped out.
When the shipping department receives the item back in stock, they can mark it as “Received” on the Shipping Board. This will push the entry to the “Past shipped” group, while clearing the connection to the Inventory Board.
It’s like hitting the reset button. The Inventory Board will show that Banner #1 is back in stock and ready for the next cycle.
And that’s the basic flow! We’re maintaining our stock levels on the Inventory Board while tracking the shipping process on a separate board. As items go in and out of stock, we simply update their status, and the boards handle the rest. It’s a seamless system that keeps everything organized and connected, making it easy to manage our inventory and shipping operations.
How to Set up the Inventory and Shipping Automations
You can automate some steps on these boards by setting some automations on monday.com. Let’s find out how to do that:
a. Inventory Board Automations
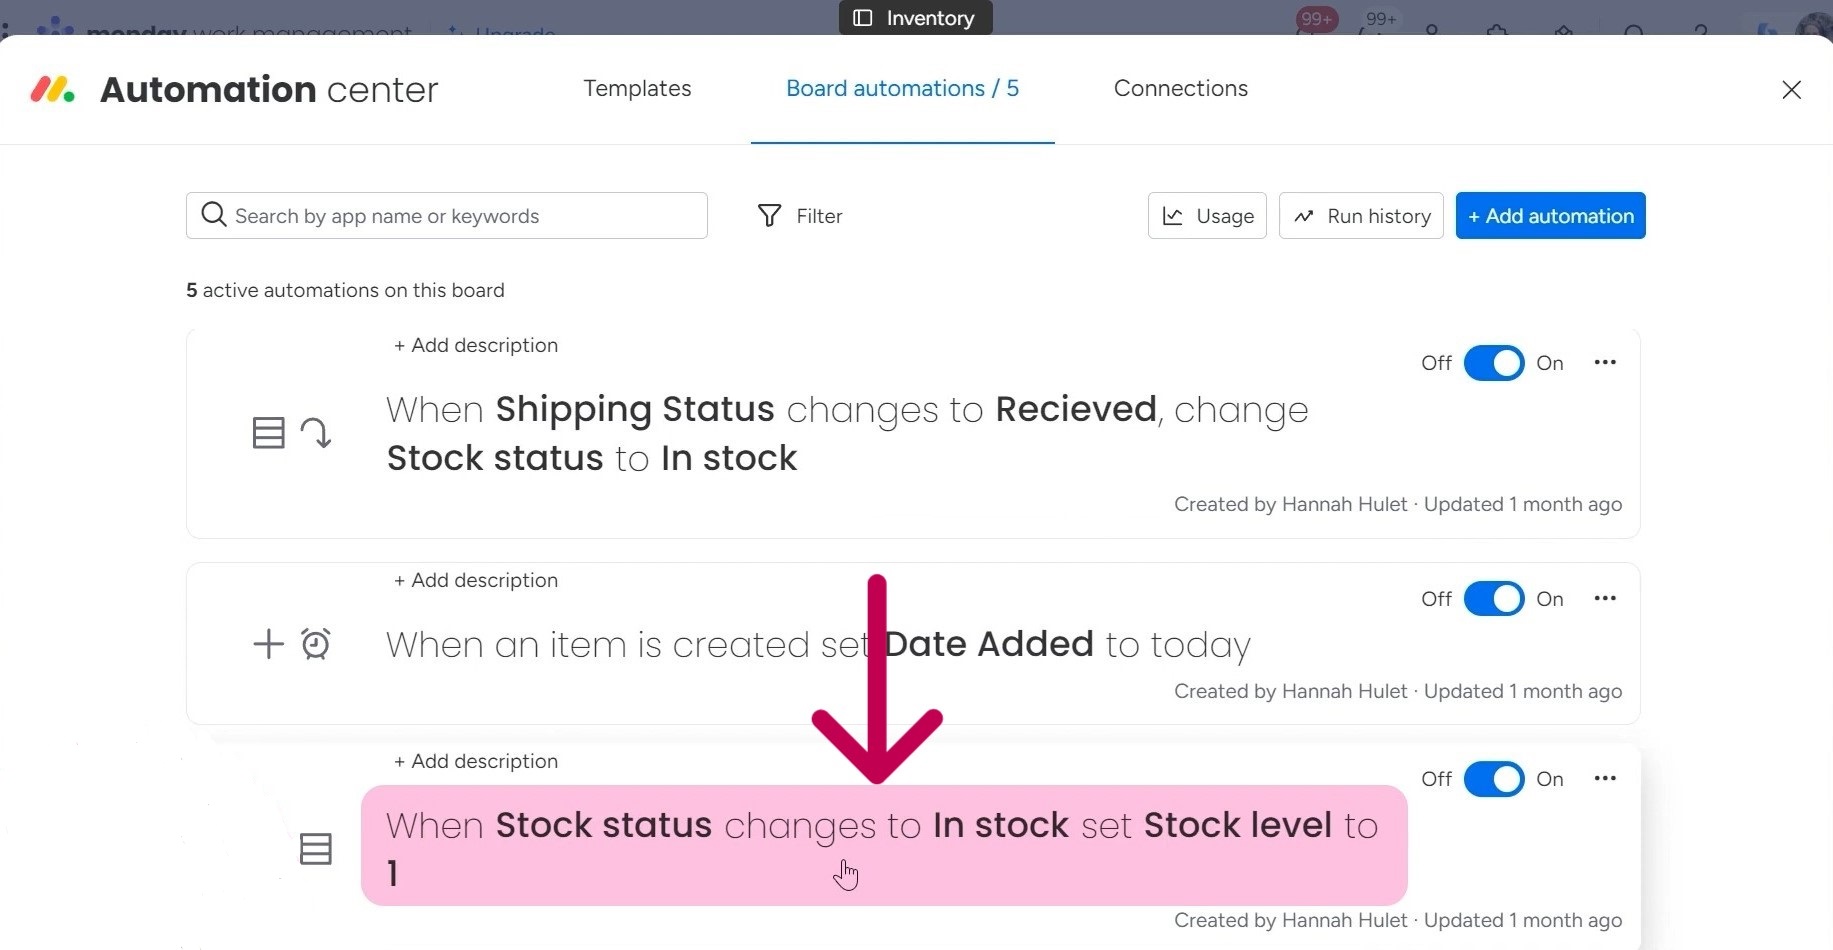
Go to the automations section on the Inventory Board. You’ll notice there are several automations here that you need to know about.
When an item’s status changes to “in stock,” it triggers the first automation. In this case, we’ll set the stock level to 1 because we’re essentially putting that item back into stock.
There’s also an automation that sets the “date added” field to today’s date whenever a new item is created, helping you keep track of when things were added to your inventory.
Now, pay attention to the automation that says, when shipping status changes to “Shipped”, change stock status to “In stock.” As soon as an item is marked as “Received,” this automation will automatically change its status on the Inventory board back to “In stock.”
Some automations are actually part of the pre-built templates. You’ll find them in the “Templates” section. You can watch this video that goes into more detail on setting up this specific type of automation using mirror columns.
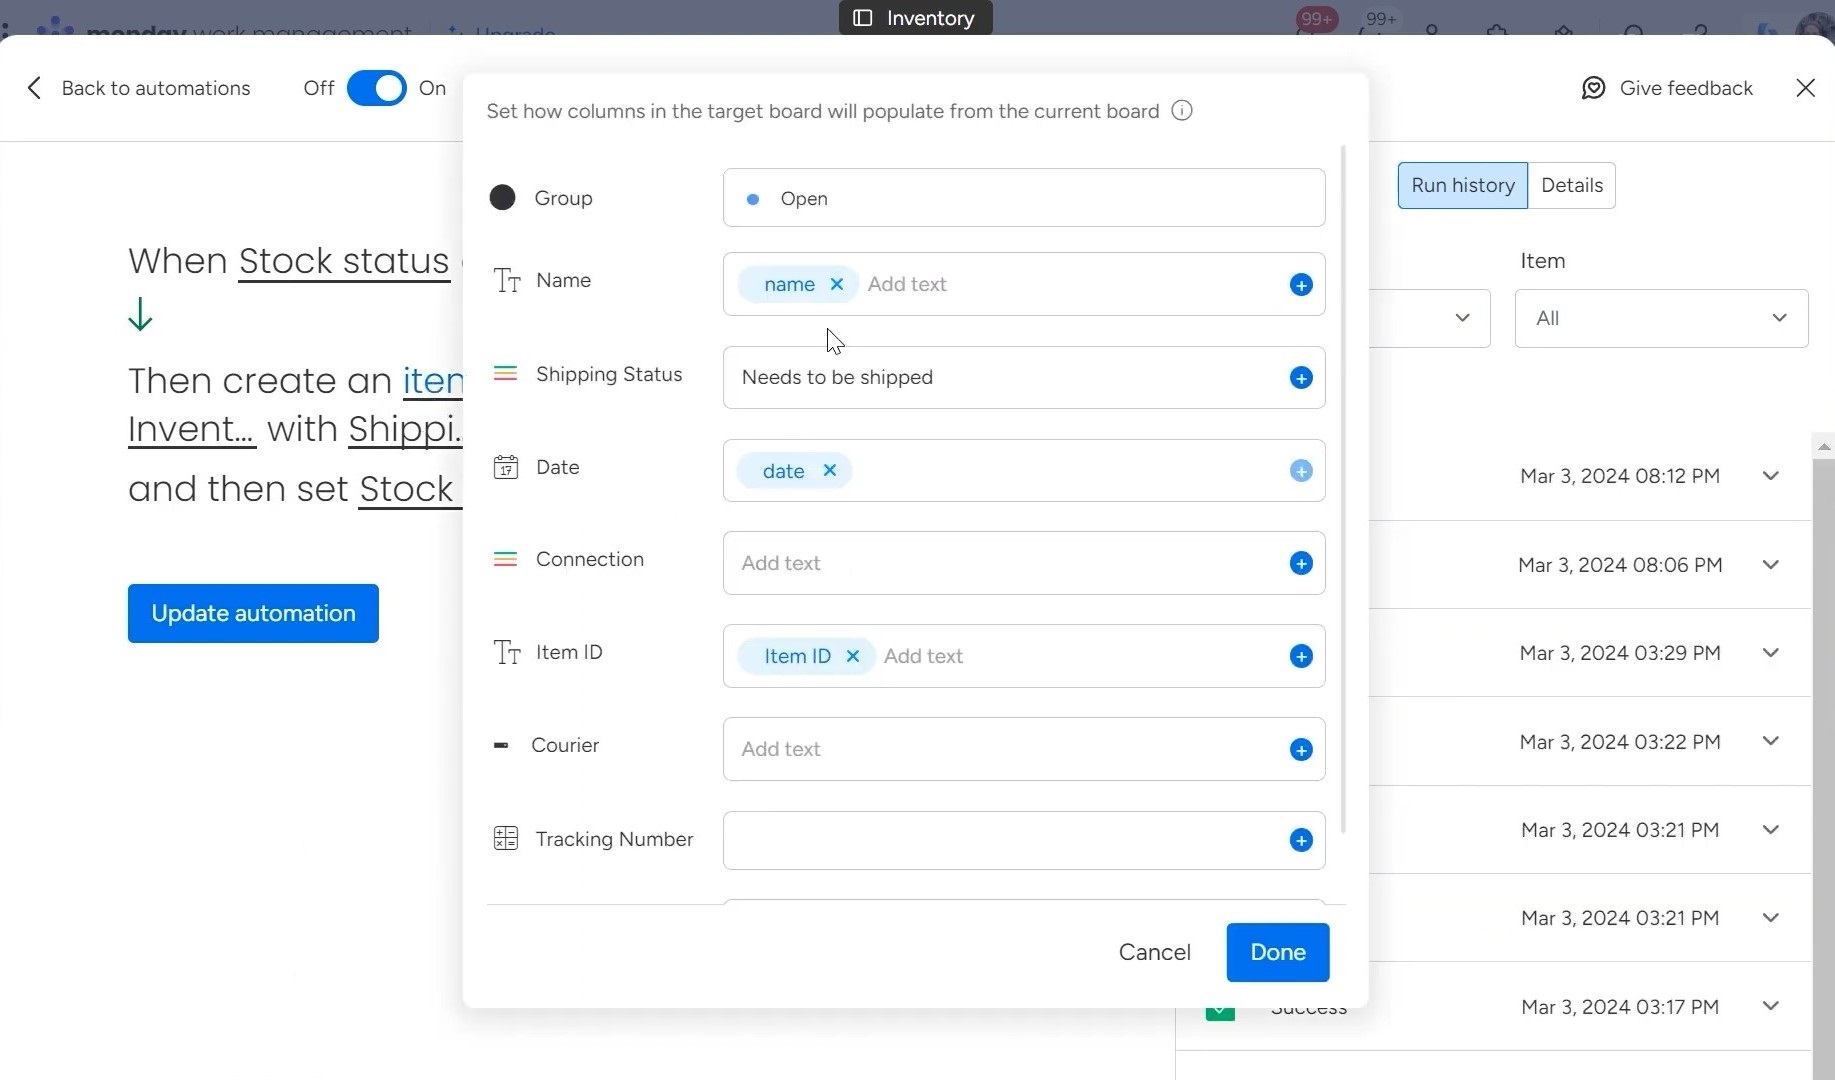
But the most important automation we have here is the one that triggers when an item’s stock status changes to “Shipped.” When this happens, it creates a corresponding item on the shipping board.
If you open up this automation, you’ll see that I’ve mapped over details like the item name, date, ID, and any other relevant information. Oh, and it also sets the stock level to 0 because, well, we’re shipping that item out, so it’s no longer in stock.
b. Shipping Board Automations
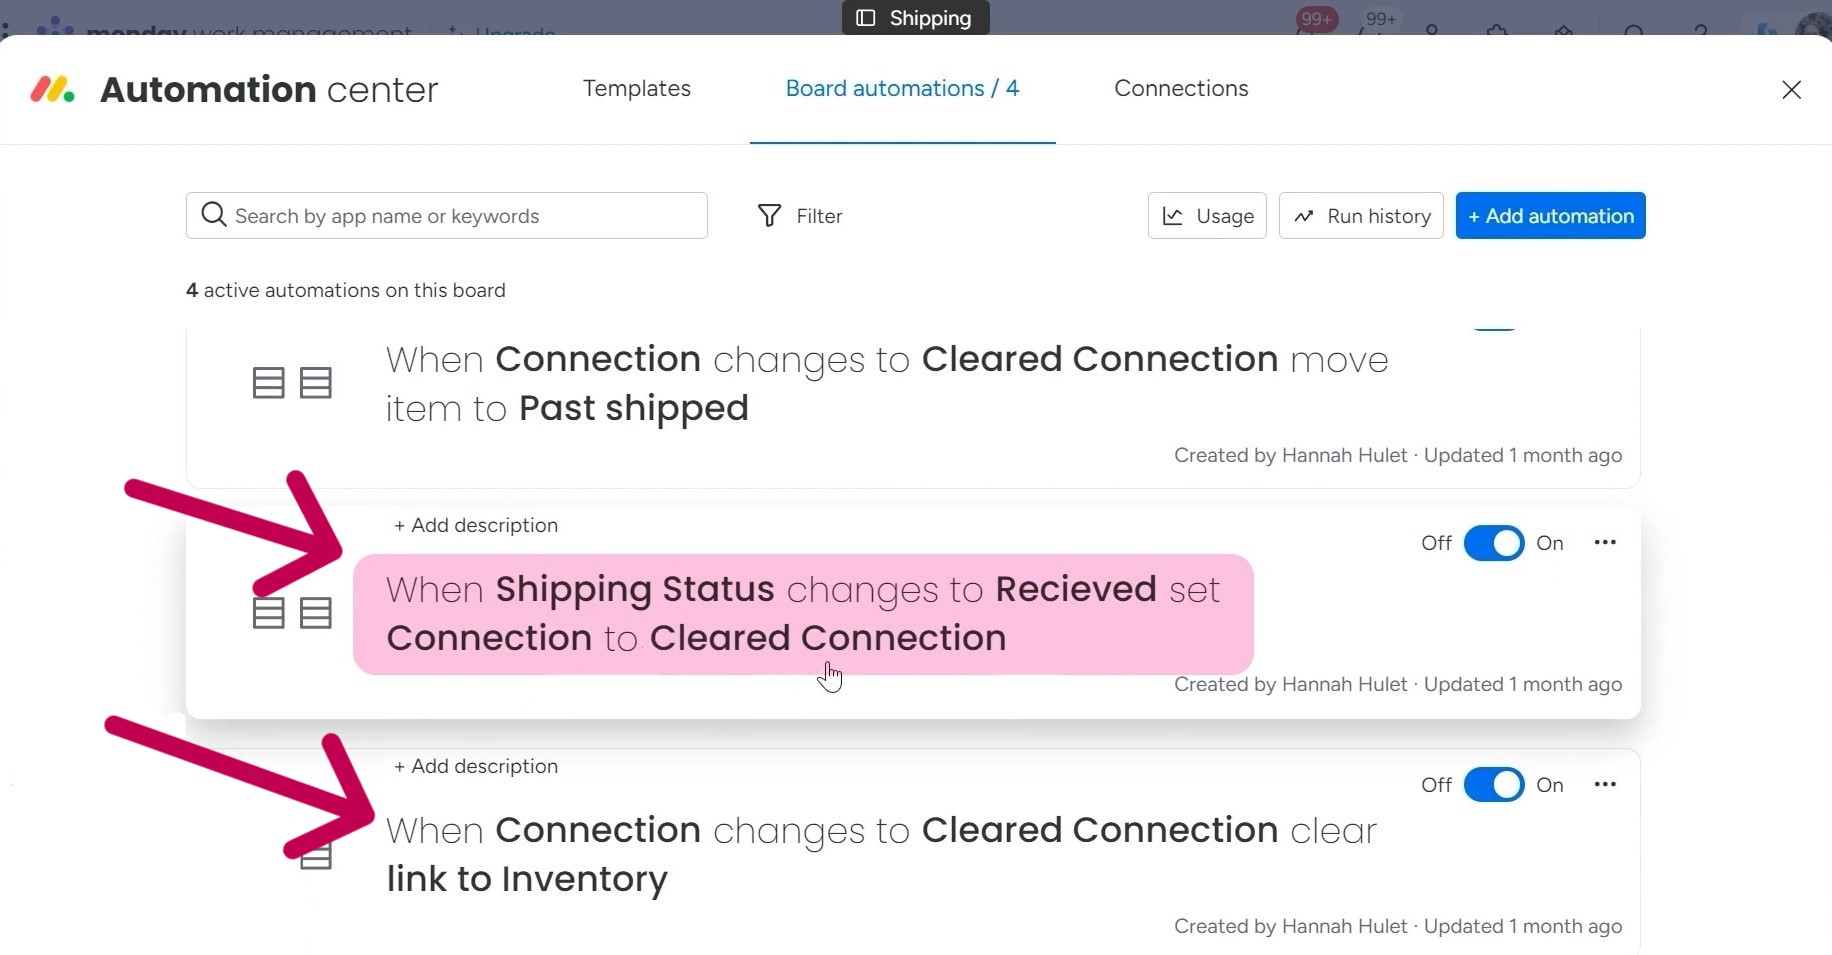
Let’s shift our focus to the shipping board now. I’ve actually set up an extra status column here called “Connection” in the “Past shipped” group.
Think of it as an action button that allows me to clear the connection between items when needed. When an item’s status changes to “received,” I want to clear its connection to the corresponding inventory board entry.
If you check the automations, you’ll see that when the shipping status changes to “Received,” it sets the “Connection” column to “cleared connection,” which then triggers another automation to clear the link to the inventory board item.
I’ve also set up an automation for when an item’s status changes to “Shipped,” it automatically moves that item to the “Shipped” group on this board. And when the status is “Received,” it moves the item to the “Past Shipped” group.
Final Words
The whole process is a closed loop that keeps both your inventory and shipping teams in sync without any manual effort. It starts on the Inventory Board. The shipping department updates the inventory stock levels after shipping, and when those items come back, they show up on the Inventory Board again as being in stock.
You can apply this workflow to any business that handles physical inventory and shipments, like dropshipping or managing rental equipment.
Struggling to efficiently manage inventory and shipments? Let Simpleday’s experts streamline your operations with monday.com’s powerful workflow tools. Our tailored setup and training ensure you harness maximum productivity from day one. Get in touch.